How to Make a Video Resumé

Most of you probably have a resumé or CV (Curriculum Vitae) to give to potential employers or others who may need it to evaluate you. Most resumés and CVs look alike, however, and often don’t get across what is particularly compelling or unique about the person it describes. In today’s competitive world, it’s important to distinguish yourself from others and create a lasting impression. How can you convey what separates you from the crowd?

One idea that is growing in popularity is the video resumé.

A video resumé is a great way to visually show who you are, what you know, and what you are good at. The idea is to create something that augments your text resumé and really drives home what makes you special. The audio-visual features of a video resumé provide quite a different perception of a person compared to the traditional, written resumé, which is typically dry and impersonal (just the facts, ma’am). The video resumé can help you get across the answers to the questions an evaluator is most concerned about:

What distinguishes you from your peers? What special skills or knowledge do you have that is in high demand? What is your most outstanding work and why is it important? What kind of person are you? What are you passionate about? How do you handle challenges? How do you work with others?

Of course, if you are going to use a video resumé, it must be outstanding. Just like a traditional resumé, a video resumé must be well organized, accurate, free of technical errors, and accessible on common platforms. Don’t even consider producing a video resumé unless you are willing to put the necessary effort into making a good one.

In this post, I’m going to go through the steps for creating an excellent video resumé, including preparation, design, recording, and sharing.

Step 1: Understand what makes a good (and bad) video resumé

As in any new endeavor, a good place to start is to see what makes a good video resumé. For many readers, especially those in the science profession, the concept of a video resumé may be totally new. I imagine most of you have never even seen a video resumé.

So let’s first take a look at a good one:

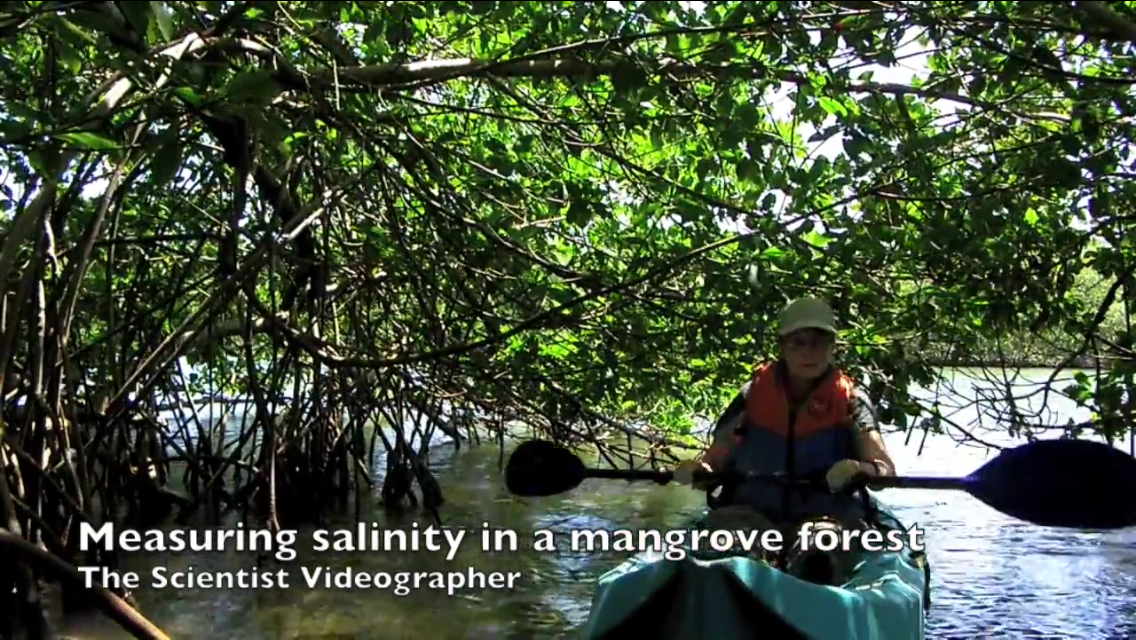
I selected this example because I thought it was technically sound as well as effective in its purpose. What features make this video resumé good? First off, the video was short (exactly one minute) and to the point. Brevity is essential because a potential employer is not going to waste time watching a long video of you, especially one that simply restates what’s on your written resumé. This video conveyed the person’s qualifications and experience effectively and efficiently. Most importantly, this video resumé actually showed the person at work, which emphasized his technical skills, his knowledge, and his on-the-job experience. In other words, the video provided visual evidence of his qualifications as an expert in a unique field. The voice-over provided additional key information about his educational background, the types of equipment and processes he knows, and the people his work supports. However, he did not go into great detail in the video about his qualifications and background—that’s what a text resumé is for. Instead, he emphasized those skills and experiences that distinguish him as a niche expert. Actually seeing him in action produced a memorable impression about what kind of person he is and why he is unique. And memorable impressions, I would argue, can help someone stand out from the crowd.

Now let’s consider another video resumé:

That video resumé is, of course, a parody, but it gets a number of points across about how not to make a video resumé: Excessive special effects, over-the-top music, a fake interviewer, a superior-than-thou demeanor, fake settings to show off impressive but unrelated activities, use of made-up jargon (the “possimpable”), talking but saying nothing, listing no useful attributes (trustworthy, punctual, detail-oriented, and AWESOME are pretty meaningless descriptors).

You can find more bad video resumés by searching YouTube with the keywords, “video resumé” and scientist. Most of these make the same mistakes:

  1. The video shows the scientist sitting stiffly in front of the camera and never deviates from that frame.
  2. The scientist simply repeats information that can be found in any text CV.
  3. The scientist does not speak clearly, speaks too rapidly, or speaks in a robotic monotone (or all three). Some are clearly reading a script.
  4. The scientist shows no energy or passion.
  5. The information presented does not distinguish the scientist from his/her peers.
  6. The video does not show the scientist actually doing science.

I could go on, but you get the picture. Once you have an idea of what goes into a good video resumé, the next step is to decide on equipment and software.

Step 2: Select your equipment and software

karenwithiphone_klmckeeYou need a device that records video, preferably in HD (high definition). You can use a smartphone, a digital camera, an iPad, or a webcam (see this post for some tips on filming with a smartphone). You will also need an external microphone to get good quality audio—especially if you are a distance from the camera (see this post about microphones). Unless you’ve got someone to help you operate your recording device, you will need a tripod (there are inexpensive desktop tripods and phone mounts you can purchase).

No matter how good you are at filming, you will need to edit the footage. For this, you need movie-editing software. If you have access to a Mac, you can use iMovie, which is easy to learn. The iMovie version for iOS can be downloaded to an iPhone or iPad for about $5. There are more expensive applications, but these usually require a lot of training and practice.

Step 3: Decide on a structure and pacing

Here, you want to set a time limit and select what type of format your video will follow. These decisions will be determined in part by the equipment you use and your experience with the hardware and software you selected in Step 2. If you have no experience with video, then a simple format may be best. Those with some experience or access to filmmaking equipment and software have more options.

clock_1024It’s important right from the start to set a time limit because that will force you to focus on only the most important aspects and to be creative. The video resumé example above was one minute long, which was plenty of time to get across key information. There are movie trailer-like templates that can be used in editing to create a fast-paced video resumé (more about this below).

The format of your video resumé can be similar to the example: footage of you conducting your work with your voice-over describing what’s happening. This approach is technically the easiest to pull off.

Another option is to speak directly to the camera, interspersed with images or clips of you working and interacting with others. If you work in really interesting environments with amazing scenery, your on-camera speech can be delivered hanging in the canopy of a rainforest, standing on a glacier, crawling through a cave or walking through an impressive research facility. However, remember the Barney Stinson example? Don’t use a backdrop that has nothing to do with your work.

If you have friends or colleagues who are willing, another idea is to film a few people you work with expressing their opinion of you (preferably good ones). A few clips of co-workers or students talking about what it’s like to work with you can be impressive—if done well.

Step 4: Write your script and plan your shots

Yes, you need to write out a script. A script doesn’t have to be followed word for word during filming, however. It’s there to help you plan your shots and keep within your time limit. Also, if you are planning to use voice-overs, a script can be quite helpful.

writingWhen I make a video, I usually start with an outline, dividing the video into three parts: a beginning, a middle, and an end. I then add the major points to cover within each section. Finally, I write out a narrative addressing those points. Once I have a narrative, I read it aloud and time how long each section takes. If I’m way over my target time limit, I will go back and cut some of the narrative or rephrase it to be more concise. I also know that I speak at about 150 words per minute, information that helps me when writing my narrative.

For a video resumé, the beginning can be a simple introduction that explains who you are and a bit about your background. In the middle, you spell out what distinguishes you from your peers. At the end, you sum up by stating your career goals or passion for your work or some other memorable ending.

Before you begin filming, you must decide who or what will be shown in each scene of your video. With a script (or at least an outline) in hand, you can better plan your filming. Go through the script, section by section, and decide what footage, images, diagrams, or other graphics will be used to deliver that information.

For the introduction, will you film yourself in the laboratory operating an instrument while your voice-over explains that you have ten years of experience working in a biogeochemistry laboratory? Or will you film yourself emerging from the ocean in scuba gear and explain to the camera that your research focuses on the effects of ocean acidification on coral reefs?

In the middle, you want to illustrate those attributes that set you apart. Be creative and try to plan footage that illustrates your key skills or experience. If you have extensive experience leading large research teams, then don’t stand before the camera claiming this experience; film yourself leading a group of people in the laboratory or the field. Don’t go overboard like Barney Stinson, though. Select a few scenes or backdrops for your footage; you can also add still images of organisms, equipment, facilities, or landscapes to your video—if they are relevant to your work.

At the end, select something memorable to say or to show. Emphasize your main message—who you are, what you know, or what you do best.

Step 5: Lights, camera, action!

The next step is to record your video. This step will likely be the most challenging for you, even if you have some experience. Because the video is about you, your image and/or voice will be part of it. Speaking in front of a camera can be intimidating, however—even seasoned teachers and professors get tongue-tied when that red light goes on. The answer is practice. Practice your script until it feels natural. Film your practices and then review this footage. This approach takes time and may be painful, but will definitely help you get over fear of the camera and to deliver your lines smoothly.

karen&camera_filterDuring filming, if you flub your lines, just do a retake. If you have trouble remembering your lines, break the shots down into smaller clips and peek at your outline or script in between takes to help you remember what to say. If all else fails, you can use the voice-over approach illustrated in the video resumé example above.

There are many do’s and don’ts in filming. You can avoid most beginner mistakes simply by being aware of them—check out these tutorials that should help:

How to Shoot Video and Avoid the Most Common Mistakes

Rule of Thirds

How to Improve the Audio of Your Video without Breaking the Bank

How to Shoot Better Video with an iPhone

New Gear for the Solo Science Videographer

Step 6: Edit and publish your video

You need to edit your video resumé so that you can remove mistakes and organize your footage into the desired sequence. You will need movie-editing software to accomplish this step. There are many tutorials on movie-editing—the basics as well as how to use specific applications. For example, the mechanics of movie editing with iMovie for mobile devices are covered in this tutorial: iMovie for iOS Tutorial Updated. If you are interested in the movie trailer format for your video resumé, I cover how to use iMovie trailer templates in this tutorial: How to Create a Book Trailer with iMovie.

Editing is more about removing material than adding material such as special effects or music. You need to be ruthless in trimming your footage down to your target length. Use only the best footage to illustrate your background, your work skills, and your on-the-job experience. These clips need not be long—even a few seconds will be enough to show off a skill. Note: scenes longer than 5 seconds will make your video resumé seem to drag. Review the video resumé example above and see how short each scene was—most were 4 to 5 seconds long.

You may want to bring in additional media (photos, graphics, animations, music) to enhance your video resumé. A word of caution here: do not use anything downloaded from the internet unless you are sure it is in the public domain (e.g., from a U.S. government website) or you get written permission (or pay a license fee). Your best option is to create all the content for your video resumé. If you need a shot of a boat, a building on campus, an organism, or a landscape, take your smartphone or camera out and shoot it yourself.

The next step is to publish your video resumé online. Even if you don’t want your video resumé publicly available, you will need to make it easy for a potential employer to view it. Most video files are going to be too large to email, and you can’t be sure the recipient will have the correct software to view it. The easiest way to share your video is to use a media-sharing site such as YouTube. You will have the option to keep your video resumé hidden from public view—only people with the link can see it. Once the video is uploaded, you can insert the hyperlink into a text resumé or you can send the link to a prospective employer. This approach also facilitates posting your video resumé on your website. An embed code is created for each video uploaded, and this is used to insert the video into a website. Watch this tutorial to see how to upload a video to YouTube: How to Upload Your Science Video to a Media-Sharing Site.

If you wish to make your video resumé publicly available, you can use the link or embed code for your published video on multiple platforms:

Your website: use the embed code for your video resumé to install a player window (in desired dimensions). That’s how I embedded the videos above in this blog post.

Your blog: if you host a blog, you can include your video resumé on the About page.

Your Twitter or Facebook Page: share your video resumé through social media, which will then automatically embed the video in your site.

Professional Networking sites: you can put the link to your video resumé on LinkedIn or ResearchGate. LinkedIn allows embedding of multiple videos. On ResearchGate, you can insert the link to your video resumé in the “About” section.

Well, that’s about it. If you are thinking about creating a video resumé, these guidelines will hopefully put you on the right track.

How To Use Video To Enrich Your Next Scientific Poster Presentation

poster_session_klmckeeMany of you, especially students, will present your research in the poster session at a scientific conference. What if you have interactive content such as a video that you would like to include in your poster display? For example, you might want to show details of your methods or to explain your work further. How do you go about doing this? At the moment, conference centers don’t offer electronic displays for this purpose–at least not enough to go around. However, there is a way to merge your static poster with video by inserting a QR (Quick Response) code that links to the video. The code, which is a unique representation of the link, is scanned with a smartphone or tablet, allowing the visitor to watch the video on their mobile device.

Below is a step-by-step description of how to use a QR code in a poster to allow someone to see your video.

First, your video needs to be online and reachable through a web link. Copy the link and go to a website that generates QR codes. There are many online that provide a free service. Here’s one that I used to create the screenshot below. Just select URL under type, then paste in the link to your video. The QR code is automatically generated; save it to your files.

qrcode_salinity

Next, create your poster as you normally would. Embed the QR code somewhere on the poster as shown in the example below. I would limit the number of QR codes to one or two per poster. Too many will be distracting or might make your poster look like an advertisement. You may need to include brief instructions for scanning the code.

poster_qrcode

Visitors will need a barcode reader app to scan your QR code. There are many to choose from. The images below show one that I have on my phone (Bakodo). Once the QR code is centered within the brackets, the app automatically scans it and gives you the option of opening the URL the code represents (it also gives a shortened URL).

qrcode_screenshot_iphone_klmckeeqrcode_screenshot2_klmckee

The app then takes the viewer to the video, which can be watched on the mobile device:

salinity_video_screenshot_klmckee


This is a great way to share your research videos at a conference. You might also use a QR code that links to your video on a flyer or resume.

The iPhone: A Film Studio in Your Pocket

One of the biggest misconceptions I encounter about video-making is the belief that one needs special equipment (expensive cameras and microphones), a film studio, and special training to make a quality video. That was perhaps true in the past, but not today. The iPhone in particular has made filmmaking accessible to anyone who wants to create a short video or a full-length documentary. In fact, award-winning films have been partially or totally shot with an iPhone. The following are a few examples.

Some of the footage for the documentary, “Searching for Sugarman” was shot on an iPhone because the director, Malik Bendjelloul, ran out of money. Most of the film was shot on Super 8mm, but a few final scenes were filmed with an iPhone and 8mm Vintage Camera app. I highly recommend this film, by the way, which won an Academy Award in 2013 for Best Documentary Feature. Fantastic example of how to tell a story. Below is the trailer for the film (if you cannot see the player window on your device, here’s the link):

A feature film, “And Uneasy Lies the Mind” was shot entirely with an iPhone 5. The director, Ricky Fosheim, explains in the trailer below why he chose the iPhone and displays some of the accessories he used (link to video in case you can’t see the player window on your device):

Here is a film featuring beautiful imagery from Thailand that was filmed with an iPhone 4s and edited with Final Cut Pro; a Vimeo “Staff Pick” (here’s the direct link to the film):

The next film was made by French filmmaker Maël Sevestre with an iPhone 4s and shows what kind of interesting cinematography can be accomplished with a cell phone camera (if you can’t see the player window, follow this link):

And there is even an iPhone Film Festival. Here’s a music video, “Summer Wine”, that won second place in that category (can’t see the player window? here’s the direct link):

I hope these few examples convince you that you can make an excellent video with your iPhone. I’m now shooting a lot of my tutorials with my iPhone 5s because of the portability and ease of use. With the launch of iPhone 6, which has an even better camera (1080p high definition film at 60 frames per second, video stabilization, 128 gigabytes of storage), amateur and professional filmmakers will have even more moviemaking power in their pockets. And combined with simple but powerful movie-editing apps like iMovie, the iPhone becomes an amazing film studio that you can carry with you anywhere.

How Video Can Help You Give Better Talks

I’ve heard that Jill Bolte-Taylor practiced her TED talk (My Stroke of Insight) 200 times. Was it worth the effort? Apparently so. Her talk has been viewed over 15 million times–one of the most popular on the TED website. Of course, her compelling story about suffering a stroke at the age of 37 and her thoughts about it from the viewpoint of a neuroanatomist had something to do with its immense popularity. However, her delivery was spell-binding. And that required a great deal of planning, effort, and, yes, practice.

I give this example to make a point or two about practicing your science talks and to make a suggestion about how to improve your performance.

Those of us in science often practice our conference talks and seminars only in our heads—rarely out loud—you know who you are. And it shows. The last conference I attended was filled with the usual boring, rambling, droning presentations that often went overtime, and my thought, sitting in the audience, was that these presenters probably had no idea how terrible they sounded. They probably thought their presentations were fine, perhaps even brilliant. Who’s going to tell them otherwise? “Hey, Professor Hotshot, your talk sucked!”

Students are told to practice, practice, practice their talks. Some do, but many try to emulate their professors—the ones who put their slides together the night before their session and then just wing it. Of course, the professor has a lot more experience speaking extemporaneously and also can get away with giving a bad talk occasionally. A student or early-career scientist cannot afford to take chances—especially in a high-stakes situation like a job interview seminar. In fact, it is just such a situation that a speaker must be well-practiced. An outstanding talk may be the main factor distinguishing the successful job candidate from the rest of the pack. The speaker not only must have internalized the talk’s content, but their voice, facial expressions, and body language should exude confidence, not nervousness or uncertainty.

So, how do you know if your talk is good or still needs some more practice? Well, how many professional talks have you given? One or two? If so, you probably need more practice than someone who has given fifty talks. If you consider yourself an experienced speaker, do people routinely tell you afterwards that your talk was great—without any prompting from you? No? Then perhaps some change is in order.

How can you assess the effectiveness of a particular presentation or, more generally, your speaking skills?

The typical advice is to give the talk to a group of friends or colleagues—several times, if possible. This is a good idea, especially for novices or anyone planning to deliver a high-stakes talk. However, this approach may not be possible or always convenient. We also may be reluctant to impose on others. Even when some speakers do get feedback, they fail to act on the suggestions because they don’t believe (or don’t want to believe) that their performance is less than stellar.

The other, less common, advice is to use video to record a speaker’s performance. I’ve found that students can especially benefit from watching videos of their speeches—particularly students who won’t accept critical comments from the audience. Actually seeing themselves fidgeting, mumbling, or rocking back and forth makes it difficult to deny what others are telling them. Often, observing themselves on camera is a great eye-opener, even for a seasoned speaker. So I think it’s a great idea to video yourself giving your presentation and then watch it to see where it needs improvement. This approach literally puts you in the audience’s shoes. You can see how you and your presentation will look to others. Is it understandable? Are there parts that are too fast, too slow? Is your voice clear and steady or squeaky and annoying? Are you using inappropriate gestures or standing like a statue? What overall impression does your body language and voice convey?

Some will balk at the advice to practice out loud and especially to use video to review their performance. “It’s too much work.” “I don’t have time–my talk is next week and I still don’t have my slides prepared!” “My delivery is fine; I don’t need to see a video to know this.” Well, I can tell you from watching videos of my talks that my perception of how well (or not) I was doing during the talk did not necessarily agree with what I saw on tape later. If you’ve never seen yourself giving a talk, then you may be in for a big surprise. You might discover that you have a distracting mannerism or that your body language says, “I don’t have a clue what I’m doing.” You might see that you spend too much time looking at your slides instead of the audience. Your voice may be a droning monotone that puts people to sleep. These are all problems of delivery that practice can help. And video can help you see what those problems are and whether you are improving with practice.

I’m surprised more people don’t use video to practice and improve their talks. Unlike when I was a student, making a video today is as easy as pulling out your cell phone. Modern smartphones have excellent video cameras, and you can use one to record and review your science talks. Here are a few tips:

1. To practice speaking, the idea is to simulate the conditions you’ll experience during the real talk as closely as possible. Stand up in front of your slides and deliver your talk out loud. Use a remote control to advance your slides; practice with a laser pointer if you plan to use one.

2. You might record your presentation in a small conference room that has a projector and screen. If that is not possible, then you’ll have to improvise in an office, laboratory, or at home. If you don’t have access to a projector, it may be possible to mirror your presentation on a TV screen. If you have Apple TV, you’ll be able to do this easily.

3. Try to stabilize your video recording device on a tripod, desk, shelf, or table and position it a sufficient distance away from you to film your entire body (or most of it).

4. If you use a phone or tablet as a recording device, be sure to position it in landscape orientation to record video.

5. It’s advantageous to have an audience for at least one of your practice videos because you want to record how well you make eye contact with audience members and also how you handle questions. If this is not possible, you might pin up photographs of people’s faces around the room to simulate an audience.

6. You might find it convenient to film your practice presentation in short segments instead of one long recording. This way, you can more easily review specific parts without having to wade through the entire film—especially if your talk is an hour long. You could divide the film, for example, at natural breaks: background/introduction, methods, results, discussion, and conclusions.

7. Review your video with a critical eye and ear for timing, body language, gestures, facial expressions, eye contact, and voice. If you spot a problem, try to figure out when and why it occurs, which may help you address it. For example, you may um and ah a lot whenever you get to information that you’re less confident about. Perhaps you need to rethink what you want to say so that you are more certain.

8. You may have to watch your video performance several times to let the initial shock (of seeing yourself as others do) wear off. However, you will become accustomed to seeing and hearing yourself on film and be able to watch critically.

9. It also helps to watch your video performance with someone else who can help you spot problems and to make suggestions for improvement. Students could work together to review each others’ videos, for example. You also could share your practice video with an advisor or some other mentor who may not have been able to hear the talk in person. Perhaps they are on sabbatical or doing fieldwork, but you really want their input. They can review the video and give you some additional feedback.

10. Courses designed to teach students how to give a scientific presentation would greatly benefit from having some or all of the talks recorded on video and reviewed by the instructor and classmates.

Very few people are naturally gifted speakers. Most of us have to work at it, but It’s difficult to improve if you have no idea of what you are doing wrong. Recording yourself with video can be an easy way to identify and correct problems.

Using Video to Crowdfund Scientific Research

Are you like a lot of scientists who are struggling to fund your research or find collaborators to share ideas and costs? If you are, then you might be interested in new platforms that bring researchers together with fellow scientists, science enthusiasts, and potential sponsors.

One such platform is Thinkable, where people can learn, track, and fund science topics that are specifically interesting to them. Scientists create a profile on Thinkable and then upload a brief video (3 minutes max) describing a new idea for a study, a recent paper, a conference presentation, or just a tour of their laboratory. The idea is to have an online meeting place where scientists can interact directly with other people who are interested in their area of research.

I was contacted recently by Ben McNeil, one of the founders of Thinkable, who is a proponent of video as a means of science communication. He had seen my blog and some of my videos and decided to get in touch. We had a great Skype conversation about Thinkable and about the use of video by scientists to connect with other researchers and especially as a means to solicit crowdfunding. Ben wrote a complimentary blog post about me and my efforts in teaching videography to scientists. I’m hoping to meet up with him and colleagues next year when I visit Australia to share ideas.

How Does It Work? Visitors to the Thinkable site can follow a scientist or a specific project by becoming a fan. A prospective student interested in a particular field, for example, might follow an established researcher and learn more about the projects they are currently working on. Through the video snapshots, potential collaborators can see where their respective research areas overlap and perhaps embark on a joint project. Or a nature lover may want to support research on deserts, rainforests, or coral reefs—wherever their specific interest lies. Fans receive updates from the research they have chosen to follow.

Someone can become a sponsor with a donation of as little as $1. Sponsors receive in return more in-depth information and updates about the specific research project they support. They can learn first-hand about an exciting area of research—how it is conducted or how the findings will benefit society. They can follow the progress of the researcher as s/he conducts experiments and interprets the results.

I set up a profile on Thinkable to test it out and uploaded a couple of videos to see how that worked. Setting up a profile is very easy and fast, as is uploading videos. You just list a few facts about yourself, a brief bio, and contact information. There are then three areas for interaction. In “my ideas”, a researcher uploads a video (or image) to introduce a campaign, a poster, a paper, or a talk. You can add as many “ideas” as you like, but are restricted in terms of how much you can say or show about each one. A campaign is specifically used to solicit support for a research project. Here, a researcher provides a brief text description of the proposed project and explains why it is innovative, as well as a short video “pitch”. In “my sponsorships”, you have the option of allowing people to donate or sponsor your research through Thinkable; you may also choose to decline this option and only showcase your research. In “my thinkers”, you select other Thinkable researchers to follow. It took me about 20 minutes to set up a profile and upload a couple of videos. The interface was easy to navigate, and the finished feed is visually attractive.

There are several examples of campaigns on the Thinkable landing page where you can get a better idea of how other researchers are using video to pitch their ideas.

Why Video? Thinkable founders have focused on video as an effective medium for sharing science information. Researchers are encouraged to use video snapshots to connect with fellow scientists, students, and science enthusiasts. Of course, I’m all in favor of video as a medium to share science information and also think that this approach lends itself well to crowdfunding efforts. Video snapshots force a scientist to pare their message down to the core idea behind their proposed project and to make their case concisely and convincingly. I find that many proposals fail because the PI gets bogged down in too much detail and neglects to state a single, clear goal and anticipated outcome. I think that making a three-minute video can help a proposer find and articulate that message. Potential supporters, especially the general public, will likely appreciate the video approach, as opposed to a lot of text.

In addition to raising funds, a scientist can showcase their research publications with brief videos on Thinkable, which are then discoverable by search engines. A video on a sharing platform such as Thinkable is freely accessible, in contrast to a journal article, which is likely behind a paywall. So someone without a journal subscription can still learn about your work by watching a video. But such visual snapshots are more than just a way to make one’s work more visible online. As I’ve explained in previous posts, videos allow authors to explain their work in ways they cannot with the journal article. Video can enrich a technical article and encourage the reader/viewer to explore the topic further.

The video format also does not violate copyright restrictions typically imposed by science journal publishers but instead allows the scientist to visually share important insights from their work. Quite a few authors infringe copyright law by posting the journal-formatted pdf on their websites or on other repositories. Some are unaware that they are violating copyright, whereas others do it knowingly and assume they won’t be challenged. A better approach is to produce a separate information product that simply displays the essence of the work in an easily accessible and understandable format—such as video. When posted online, these visual products serve as pointers to the original publication hosted on a journal’s website. You own the copyright to the video since you’ve created it using your own media and data from your publication (as author you retain intellectual property rights to your data and any contents of a publication).

Filling a Need. Although other video-sharing platforms such as YouTube are currently where many scientists are posting their videos, there is a need for dedicated platforms where researchers can share information and interact with science information consumers and potential sponsors. I think there will be more platforms like Thinkable in the future, and many will be designed around video to solicit funding or to display scientific information. Science information consumers and sponsors will increasingly expect media-rich content on such sites, and scientists must be prepared to provide it.