How to Improve the Audio of Your Videos Without Breaking the Bank

The success of your video will depend in part on good audio, which will require a decent microphone. You will need a good microphone during filming with a video camera as well as for doing voiceovers during editing. Which microphone you need and can afford will, of course, vary with your situation. Although there are many microphones that provide excellent audio quality, these are often quite expensive and may be out of reach for students and scientists with limited budgets. If so, there are some inexpensive options that will improve your audio, which I will emphasize here. In this video report, I demonstrate a few ways to improve the quality of your audio without breaking the bank.

Most camcorders and other cameras that shoot video have built-in microphones that will work fairly well–as long as the speaker is close enough to the camera, and there is not a lot of background noise. Many of my videos were filmed using the built-in microphone on the camcorder or digital camera. This approach works fine when the speaker is stationary and speaking directly to the camera from no more than a few feet away. If the speaker is moving around or standing a distance from the camera, however, then it’s best to use some type of external microphone to boost the quality of the audio. The lavalier or lapel microphone is likely to be what the scientist videographer will find most useful. These are tiny microphones that clip onto the lapel of the person speaking and are connected via cable or wirelessly to the camera or a separate recording device.

Unfortunately, not all video cameras come with receptacles for microphone jacks. One of my favorite point-and-shoot cameras, which shoots outstanding HD video, has no option for attaching an external microphone. My solution is to use my iPhone as an audio recording device and an external microphone with a jack designed to work with the headphone receptacle.

The other situation requiring a good microphone is when doing voiceovers for your video. If you rely on the microphone on your computer or an inexpensive external microphone, your voice will likely sound “tinny”, and the overall quality of the audio will be noticeably poorer. I invested in a studio-quality microphone with a USB cable to connect to my computer. The better microphone has made a huge difference in the quality of my videos.

New Gear for the Solo Science Videographer

I’ve just gotten some new gear to assist with making solo science videos with a Smartphone….for those times when you don’t have anyone to help you. In the following video, I introduce some accessories (microphone, cable, monopod) that will facilitate filming alone with your Smartphone and will also make your videos look and sound much better.

If you like the tip, please leave a comment!

Links to where you can purchase this equipment are given below the video.

The microphone you will need:

Edutige EIM-003 i-Microphone

The cable you will need:

Smartline (ESL-001) Extension Cable

The monopod you will need:

iStabilizer ISTMP01 Smartphone Monopod


What Comics Can Teach Us About Making Science Videos

Huh? Comics? Are you serious? You probably think I’ve taken leave of my senses….but bear with me.

One of my favorite non-fiction books is Understanding Comics: The Invisible Art by Scott McCloud. Despite its age (published in 1993), this book is one of the most creative and entertaining books I’ve ever read about visual storytelling. In this book, McCloud covers the history and theory of comics, using the comic book format brilliantly to make his points about this under-appreciated art form.

And did I mention that I don’t even particularly like comics? That should tell you just how great this book is.

I happened to see a reference to it somewhere (many years ago) and was intrigued by comments about how deeply the book explored the form and substance of storytelling as well as the history of “sequential art”. I ran right out to the nearest bookstore and bought it. I was not disappointed. I’ve reread it several times over the past twenty years or so and often recommend it to people.

Forget whatever you think you know about comics. Anyone who engages in any type of visual storytelling can learn something from this book…and be entertained at the same time.  Even though it was first published twenty years ago, the content is timeless and perhaps even more relevant now, in the digital information age. Despite its topic and engaging delivery, Understanding Comics is a serious book. At its core, this book is about creativity. The information McCloud presents goes far beyond comics and can be applied to virtually any creative process, even those not involving visual formats.

The idea to use the comic format to write a book about the comic art form was clever and, moreover, was executed flawlessly. McCloud appears in the book in the form of a cartoon image with an engaging “voice”, which we (the readers) immediately accept as our guide through the world of comic art. We very quickly realize, after the first page or so, that the view of comics as simple-minded cartoons is based on very superficial features and not reflective of the artistic and intellectual processes underpinning the medium. As any writer or artist knows, creating something that tells a complex story but appears to be simple is very, very difficult. McCloud dissects the process of stripping things to their basic elements and reassembling them to tell a compelling story through the medium of “sequential art”. He articulates several theories and develops models about visual storytelling, such as the concept of  “closure” and the six steps that comic book artists (and other artists) take in going from an idea to the final product.

If you care even a little about how the creative process works, you’ll like this book (and if you like comics, you’ll love it). For those of us interested in making science videos, however, books such as this reveal a lot about how we see things and how to convey abstract ideas so that others can also see them. Learning how to turn the abstract science concept into something concrete (and at the same time be entertaining or compelling) is one of our biggest stumbling blocks in creating effective science videos. Scientists also have particular difficulty in turning what they want to say into something a viewer wants to hear (and see). Understanding Comics provides a peek into another storytelling medium that can show us how we might overcome these barriers….or at least inspire us to try.

Can You Make a One-Minute Science Video and Why Would You Try?

I was talking to a colleague the other day about making videos to demonstrate a sampling technique. When I suggested to him that it was possible to create such a video and keep it short–around a minute in length, he expressed disbelief. He questioned (1) why you would need to do such a short video in the first place and (2) whether you could even get your message across in a minute.

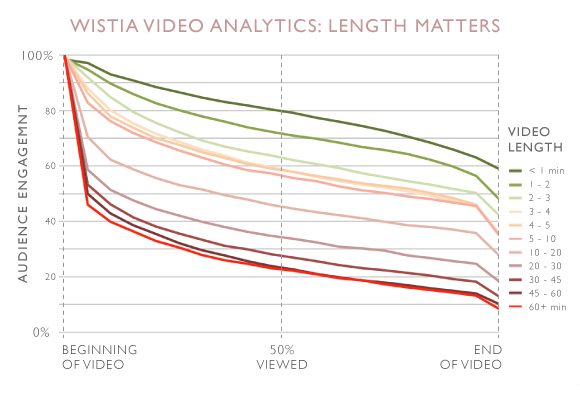
I explained, in response to his first point, that the shorter the video the more likely the viewer would watch the entire thing. If you’ve been reading this blog, you know that one of the key features of a successful video is brevity–typically under three minutes, but around one minute is considered by some to be an ideal length. Some statistics seem to suggest that viewers watch an average 30-second video 85% of the way through, with many of them sticking around until the end, whereas most viewers will watch only 50% of a 2-minute video. In other words, shorter videos are more engaging to the average viewer.

Wistia

One point that occurs to me and that video analytics don’t seem to consider is that these statistics reflect how all viewers react to the video, rather than how the target audience is responding. Many people will click on a video link out of curiosity but find that it is not what they are looking for. Sometimes this decision is made in the first second or two but may also take a bit longer. These people were not your target audience. What would be useful is information about how engaged the target audience is in a video. Video analytics (such as those above) do not distinguish the target from non-target audience (and I’m not sure how easy this would be to do anyway). Someone who is only marginally interested in a topic is much more likely to prefer a shorter video, whereas someone committed to learning something will be willing to invest more time. Statistics seem to suggest that there’s not much difference in viewer engagement between a 4-minute video and a 10-minute video. Viewers who stick around for 4 minutes are likely to watch a longer video through to the end. This insight is important especially for an instructional video. Someone intent on learning a technique will likely be willing to watch the entire video.

In addition, it is sometimes impossible to explain a complex topic in one minute. In that case, you should take the time necessary but put your most important information as close to the beginning as possible, similar to how journalists write news articles. An instructional video also may need to be a bit slower to allow the viewer time to absorb the information, adding to the length. The point is that you should keep your target audience in mind when deciding on length, especially for an instructional video.

Nonetheless, if you can get your instruction across in one minute or less, you should not drag it out any longer than that. Besides the direct effect on viewer engagement due to length, striving to keep the video short encourages you to be more creative and to eliminate extraneous material that just bog things down, which will also have a positive effect on viewer engagement. In fact, I suspect that the latter effect on the quality of the video is often what makes shorter videos more engaging than longer ones. For the scientist videographer, however, this means more work to simplify things sufficiently (without sacrificing accuracy) and to package the information in a more entertaining way.

As to whether a video describing a complex science topic can be done successfully in a minute or less, there are plenty of examples (check out MinutePhysics). But what about a video describing a sampling technique? In the next post, I will critique a 1-minute science video that describes a common sampling method in ecology.

Using iPhone Panorama Images in Your Science Videos

I’m constantly amazed at how useful the iPhone is for capturing video and still images. I’ve been playing around recently with the panorama option on my iPhone 4 camera. If you’ve not discovered this yet, it’s worth checking out. Instead of taking a series of shots and later trying to stitch them together, the iPhone (and some digital cameras) has a panorama option that automatically does this for you.

To activate on the iPhone, you need to tap the camera icon, and then tap “options” at the top of the screen. Then select the panorama option, which is at the bottom of the list.  The “lens” then opens and you are presented with a box with an arrow pointing to the right. Position the iPhone to start at the far left of the landscape you wish to capture and then pan the camera smoothly from left to right, keeping the arrow aligned with the line inside the box (you can reverse the direction of the pan by tapping the arrow). You should continue your sweep until the image reaches the end of the box (you can cut the pan short by suddenly switching direction).

It takes a bit of practice, but once you get the hang of it, you can capture some spectacular images (see below; note that these embedded images are about 20% of the original size; to view them full screen, click on the image).

Cable Bay, New Zealand

Kaiteriteri Beach, New Zealand

Kuto Bay, New Caledonia

Coeur de Voh mangroves, New Caledonia

The iPhone panorama option works best with landscapes such as the ones shown above. But you can see that they produce something close to what the eye actually sees when looking at a landscape. My husband has a camera that also takes panorama images (he took the the fourth image of the mangrove forest with his Sony Cyber Shot), but we found that the iPhone panoramas (top three images) were much easier to capture and often looked better.

I then began to wonder if these panoramic images might be useful in a video. I imported one and discovered that this turns out to be an easy way to get a smooth pan of a landscape, something that would otherwise take a tripod and a steady hand to sweep the camera. See the video below to show how I “edited” a panorama image in iMovie to create a pseudo-pan.