Use Animation to Tell a Story about Science

Telling stories about science can be fun and rewarding, but not always easy to accomplish with video. Animation software can help us tell our stories in a way that is appealing both visually and emotionally. Animation can be an especially good option when live action is difficult or impossible to film. You can let your imagination go wild in an animated film. The laws of physics can be suspended. Time can be compressed or expanded. The action can take place on Earth, on a distant planet in the Andromeda galaxy, or in an imaginary world populated by talking tomatoes. The hero can be a human or, just as easily, an animal or a machine. Characters in a story can have ordinary traits or be imbued with magical powers. The possibilities are endless.

Animation can come in handy telling stories about science or scientists. With an animation, a science filmmaker has much greater freedom to present a concept or to share a particular viewpoint. For example, you might want to show how an atoll develops over millennia from an underwater volcano (see video below), but there are some aspects that cannot be filmed easily. Using an animation to illustrate the different stages in atoll development, for example, lets the filmmaker depict geological processes that are too slow to film—and simultaneously makes the entire process easier to visualize. Basic animations like the ones in Birth of an Atoll can be created in PowerPoint.

Don’t want to have a human narrator or protagonist in your science video? With an animated film, a filmmaker can build a story around a non-human character with very human thoughts and feelings—one that appeals to a broad audience. A great example is the Disney-Pixar animated film, WALL-E (see movie trailer below), which features a lonely cleaning robot on a garbage-filled and lifeless Earth who falls in love with EVE, a more advanced robot sent to scan the planet for signs of life. The film quickly draws you in and makes you root for the little robot. Many things happen in the film that are far-fetched, but are readily accepted by the viewer. And the film gets across a message about what might happen to the Earth (and to the human race) if we aren’t careful. Telling the story from the viewpoint of a sentient machine helps the audience see, through other eyes, where rampant consumerism, corporatism, and human reliance on technology might lead. This approach works because the viewer becomes emotionally invested in the story and its characters and is thus more receptive to the underlying message.

Of course, the production of WALL-E required a vast team of scriptwriters, designers, animators, sound specialists, and more. However, you don’t need an army of professional animators to create a short film to illustrate a scientific concept or to tell a story. As I mentioned above, simple animations can be produced in PowerPoint. And for more sophisticated animation, there are a number of animation software packages that are available for both professionals and non-professionals. However, the learning curve for these applications is usually steep. And to create comic-type animations, you need some serious drawing and design skills.

What’s needed is something a bit more user-friendly. A few years ago, I discovered  MotionArtist, a Comic Animation software by SmithMicro and tried the beta version of the software to create a graphic story (Brown Marsh Apocalypse). It’s been upgraded since then, with several improvements and bug fixes. This software basically lets the user create story panels (like the ones in a cartoon), import media and then add motion to individual on-screen objects as well as to sequence everything in a timeline to tell a story. MotionArtist was designed primarily for comic artists to import their illustrations and then to animate the artwork, converting it to digital format for posting online. However, use is not limited to this narrow purpose. The import function also lets the user bring in images, video clips, and audio tracks—and these can be sequenced to tell a story—in much the same way movie editing software works to sequence video clips. Layered Photoshop files can also be imported—as a composite or as individual layers, which can then be individually animated. The screenshot below shows the MotionArtist workspace in “Director view” (click on the image to see full view).

screenshot_ma1

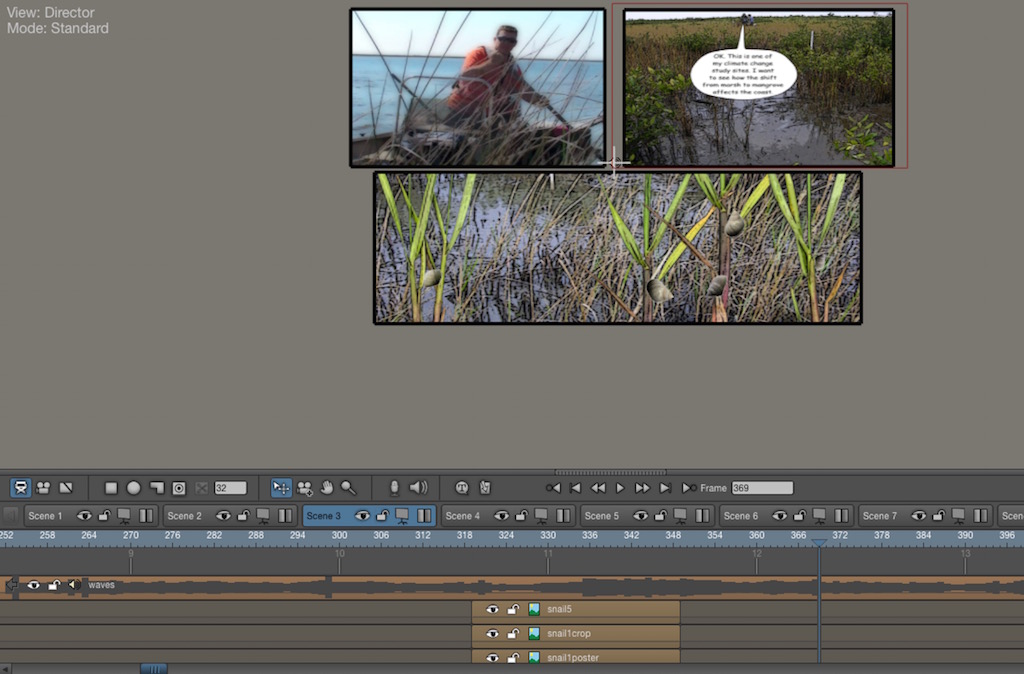
In the timeline (at the bottom of screen), the user creates scenes to build a storyline. Each scene contains one or more panels. A “camera view” lets the user pan across panels or zoom in or out of a panel. The scene pictured above contains three panels, the size and shape of which can be customized with shape-drawing tools. The top-left panel contains an imported video clip. The top-right panel contains a photo and a word balloon. Word balloons are easily created and animated, allowing the user to produce conversations by the characters in the story. The bottom panel contains a background photo and several individual objects (images of plant stems and snails) that were imported separately and that can be separately animated. For example, I can have a sequence in which the snails are moving up or down the plant stems. Each imported object or panel is represented in a track, stacked in the timeline. Stop points (like keyframes) are used to set the timing for each track. I wanted to add some background sound and so imported an audio file of waves lapping on the shore (this audio track is the top-most track in the timeline). The user can play the working files back in real time, which helps in editing. Once the animation is completed, the user can preview the HTML5 file online in a browser window or export as an interactive HTML5 file or as a video file.

To relearn how to use the software and examine the various features that might work with my media, I used MotionArtist to 1) illustrate a biological process and 2) tell a graphic story. I first tried to animate a leaf falling from a tree canopy to the forest floor where it fragments and decays (see video below). I used only four photographs to create this animation. You can see this brief animation below. In a future tutorial, I will show how I used MotionArtist to animate the leaves.

I also wanted to create a longer animation that told a story….one that would require me to use more of the tools and features of MotionArtist. I decided to do a sequel to the Brown Marsh Apocalypse and tell a new story about how climate change may affect coastal ecosystems in the Mississippi River Delta. Warmer temperatures during the past few decades have allowed the spread of tropical trees (called mangroves), which are replacing salt marsh grasses. How will such changes affect the coast? The tale of this environmental change is again told from the viewpoint of a marsh snail who was the hero of the previous video. This story follows Perry on a quest to find out how climate change may change the snails’ home and way of life. As you’ll see in the video below, I was able to tell the story with mostly photographs and text balloons.

In conclusion, I had a lot of fun playing around again with the MotionArtist application. I found this latest version of MotionArtist relatively easy to use, although some tasks took a bit of trial and error to figure out. As the examples I’ve shared here illustrate, animation software can be used effectively to demonstrate a scientific process or to tell a story about science…and it need not require artistic skills that the scientist videographer lacks. All it takes is imagination and the ability to visualize the story you wish to tell or the process you wish to convey.

How to Get and Keep Your Video Viewer’s Attention

Video is a fantastic medium for the communication of science. However, it’s not an easy medium to master, especially for science professionals who are not typically trained in filmmaking techniques. I’m not talking about the technological challenges of using audiovisual equipment and software, though. I’m talking about how to design a video that others want to watch.

When I first began making videos about my research, I approached the process like a scientist rather than a filmmaker. My natural inclination was to communicate the way I had been trained as a science professional. We are taught to communicate by presenting a logical series of facts and findings, supported by data—lots of data. We are also taught, in the interest of accuracy and precision, to include excruciating detail—all the uncertainties and limitations of our findings. And, we must look and sound serious when delivering a science message—otherwise, our colleagues won’t find us credible. This approach may work just fine with our peers but does not necessarily work for other audiences. In fact, it often fails miserably with the general public.

In the beginning, it never occurred to me that I needed to look at things from a filmmaker’s viewpoint rather than from a scientist’s viewpoint (this insight continues to be the one that most surprises and confounds the science professionals who attend my workshops and webinars). But over time, I gradually realized that using video as a communication tool required me to meet the video viewer’s expectations, which is different from someone reading an article or listening to a conference presentation. This is true even if the viewer happens to be a scientist with specialized knowledge of the topic. We all interact with videos in the same way. In addition to gaining information, we expect that information will be delivered in a certain way—one that doesn’t bore us to tears. Too often, though, that information is presented like a bad-tasting medicine (take this, it’s good for you). Not surprisingly, few people want to watch.

So, what does work?

For the answer, one need only look at popular science video channels on YouTube: Veritasium, Smarter Every Day, MinutePhysics, and ASAPscience. In fact, let’s look at an example video from Veritasium by Derek Muller who creates videos about science (often physics) and then I’ll talk a bit about why it’s so effective.

OK. This is one of the more popular videos on the Veritasium channel: 8,967,145 views since its posting February 24, 2014. That works out to an average of about 10,400 views per day. Many of his other videos have similarly received millions of views; one has almost 33 million views. The popularity of the overall style of Veritasium’s videos is further evidenced by the number of subscribers to the channel: more than 3.5 million people. So I think it’s safe to conclude that these videos are very popular and that the channel has succeeded in reaching a lot of people.

What specific features set Veritasium’s videos apart—features that you might employ to improve your science videos? Here is my analysis:

  1. Lead with Awesome. A lot of science videos, especially those created by scientists, start out with a long, boring exposition. In contrast, most of the videos on Veritasium start with a bang. Little time is spent at the beginning explaining or introducing the scientific concept to be featured in the video (that information is provided later). The videos on the Veritasium channel typically open with a “hook” such as a question, an intriguing observation, or an amazing demonstration. In other words, the video gets right to the point in the first few seconds. The video, “2, 4, 8” is a good example. In the first ten seconds, the video asks if you can figure out the rule behind the number series. Also, notice that no time is wasted on awkward introductions of the people in the video, including the host, Derek Muller.
  2. Challenge Misconceptions Carefully. Many of Veritasium’s videos try to correct common misconceptions about scientific concepts, but in an indirect, non-threatening way. A direct approach might have a scientist on camera list common misconceptions and explain why they are wrong. This tactic is often not effective, partly because the viewer may feel that they are being “talked down to” or lectured  by someone with superior knowledge—and they become more resistant to hearing the truth. Instead, Muller interviews average citizens on the street to get them to reveal common preconceived notions or misunderstandings about a particular subject. The expert then leads everyone, including the viewer, to the correct answer. In “2, 4, 8”, we see a series of people struggling to figure out what “rule” Muller has in mind. The viewer can’t help but play along. The outcome is that instead of being a passive receptacle for information, the viewer becomes an active participant in the exercise that eventually reveals the answer to the puzzle. The expert (Muller) then explains (briefly) the significance of the exercise.
  3. Don’t Over Polish. I think people are turned off by “shock and awe” science videos that contain over-the-top animations and are produced at great cost by film studios. One reason may be that such videos seem to be desperately trying to get the viewer’s attention with special effects rather than relying on the awesomeness of the science. The Veritasium videos are technically sound, but not “slick”, and one gets the idea that these are low-budget productions. In the “2, 4, 8” example, the video was shot on the street by Muller’s mother who operated the camera. Such unpolished videos appeal to many viewers and may even enhance their admiration of them.
  4. Be as Brief as Possible. Most of the videos on the Veritasium channel are brief—just a few minutes in length—enough time to get across the basic concept without trying the viewer’s patience. The “2, 4, 8” video was just under five minutes. But there is no perfect length. A video should be as long as necessary to get across the message. The scientist videographer is often tempted to cram in more details, but too many details can obscure the message. The “2, 4, 8” video could have included much more information about the scientific method, but this would have been overkill. We just don’t need a long lecture about confirmation bias or Karl Popper to “get the no”.
  5. Keep the Viewer’s Interest. Veritasium videos, including “2, 4, 8”, are designed so that the viewer gets invested in watching the entire thing. The longer you watch, the more interesting things you get to see and hear about. As a viewer, you are interested not only in the answer to the riddle but whether you can figure out the “rule” before any of the people Muller is interviewing. If you figure out the rule early in the video, you continue watching to see if you are correct and also how long it takes the other people. If you don’t figure out the rule, you continue watching to see what the answer is. Either way, you’re hooked. Check out the comments below the “2, 4, 8” video. Many commenters talked about whether and when they figured out the answer.

Oh, I almost forgot the most important aspect of these videos: they are fun to watch! Here’s one more from Veritasium to illustrate the point:

Filming with a Smartphone: 20 Basic Camera Shots

Remember the opening scene in the original (1978) Halloween movie? In that scene, we see the exterior of a house, but from the point of view of one of the movie characters, which happens to be Michael Myers, the crazed killer…but as a child. He is creeping around looking in the windows of the house at the people inside. The camera faithfully shows us what he sees as he enters the house, opens a kitchen drawer, and takes out a large knife. We don’t see him, only his hand and what he is looking at. The suspense builds as he climbs the stairs to the bedroom…

That scene from Halloween used a point-of-view shot, which is one of a variety of camera shots used by filmmakers. A shot is the space seen in a frame of film. Different types of shots (wide shot, close up, cut-away) are used to show a film’s setting and its characters, as well as to set a mood or otherwise convey unspoken information to the viewer.

You are probably vaguely aware of the different camera views and moves that are used in the making of movies, even if you can’t name them. Of course, professional filmmakers know all the basic shots because that knowledge is essential when making a film that people want to watch. But did you know that you, the scientist videographer, can use the same set of camera shots to add visual variety to your science videos?

In the following video tutorial, I provide examples of 20 camera shots that you can use to make a video with a smartphone. I’m focusing on shots that can be done easily with a smartphone since many people are now using them to make their videos. I’ve illustrated each shot with one or more clips from my own video library. Most of these are traditional shots used by filmmakers, but I included some additional ones that I, well, totally made up. But I think you’ll find that they all will give you some ideas of different ways to shoot your videos, which will make them much more interesting to your viewers.

Here is a list of the 20 basic camera shots, along with a brief explanation, that I cover in the video.

  1. Extreme Wide Shot: In an extreme wide shot, the subject is visible but the emphasis is on showing him in relation to his environment.
  2. Wide Shot: The subject is closer to the camera in a wide shot, but he is still shown in perspective to his surroundings.
  3. Full Shot: A full shot is even closer, but the subject’s body is still in full view.
  4. Mid Shot: In a mid shot, only part of the subject is visible but the view gives an impression of the whole.
  5. Medium Close Up: A medium close up shows more detail by framing the subject’s face and upper body, for example.
  6. Close Up: One portion of the subject, such as a face, takes up the entire frame in a close up.
  7. High Angle: A high angle shot looks down on the subject or scene, perhaps to show an activity as in these examples.
  8. Two Shot: A two shot is a shot of two people in the same frame.
  9. Group Shot: A group shot shows three or more people in a frame.
  10. Cut-in: A cut-in shot focuses more closely on some aspect of a scene or subject. This can be done by moving the camera, as in this example, or by the subject moving closer to the camera, as in this second example.
  11. Cut-away: A cut-away shot moves the view away from the main scene or from one subject to another, as in this example.
  12. Pan: A pan moves the camera horizontally to sweep across a scene. It’s better to use a tripod to pan smoothly, but if you don’t have one, you can also move the camera freehand as in these examples to gradually reveal your subject.
  13. Tilt: A tilt shot moves the camera vertically. For example, to reveal a tall object.
  14. Tilt & Pan: A combination tilt and pan shot can be used to follow an object moving through space such as this quadcopter.
  15. Aerial Shot: An aerial shot is a view from a plane, a helicopter, or a drone.
  16. Point of View (POV) Shot: In a point of view shot, the camera shows what the subject is looking at. This shot can be used to put the video viewer into the subject’s shoes.
  17. Moving Vehicle Shot: The moving vehicle shot is a view of subjects being transported through a scene in a boat, car, or other vehicle.
  18. Selfie Shot: The selfie shot is when the subject is holding the camera and filming themselves talking or engaging in some activity. The selfie shot is accomplished with the aid of a selfie stick and a phone mount.
  19. Selfie Arc Shot: In an arc shot, the camera circles the subject. The selfie arc shot is one in which the subject twirls in place while shooting a selfie. This shot sustains the same view of the subject but reveals the subject’s surroundings in a 360 degree turn.
  20. Entrance/Exit Shot: With the camera fixed in place, a subject can move toward or away from the camera. Such shots can be used to open or close a video.

Free Copies of The Scientist Videographer eBook Available at Smashwords

In addition to Apple’s iBooks and Amazon’s Kindle, I’ve just published a copy of The Scientist Videographer at Smashwords. At the latter, you have the option to download the book as an ePub, pdf, Mobi, or txt file or to read it online.

For a limited time, I’m offering copies of the book at Smashwords free to anyone who agrees to review the book at any of the above distributors. All you have to do is send me a note that you agree (thescientistvideographer@gmail.com), and I will give you a promotional code to use when you check out. Already have a copy of my book? Consider writing a review and use the promotional code to give the book as a gift to a friend or colleague. This offer ends April 21, 2016.

Smashwords screenshot

Kindle Edition of The Scientist Videographer Now Available

I’ve produced a text-only version of my book, The Scientist Videographer, which is now available at Amazon for Kindle. This Kindle version was created for those science professionals who do not have a device (iPad, iPhone, Mac) to read the iBooks version of my ebook. This new version has all the same information content as the iBooks version, but the interactive content (video, slideshows) is accessed through hyperlinks instead of being embedded in the book.

If you have a PC, you can also download the Kindle Reader app and view the book on your computer. The link to that app is on the main page for the book.

The Scientist Videographer-Kindle Version

Both the iBooks and Kindle versions contain new information and updated tutorials. For example, the iMovie editing tutorials have all been updated to reflect the most recent version of that software. I’ve also added a section called, “Should I Get Permission to Film”. If you have the iBooks original version, just open it in your iBooks reader and select “update”. The updated version (Version 1.2) will automatically replace the  original version (Version 1.0).