How Long Does It Take to Make a Video?

This question is the one I get most often from science professionals attending my workshops and seminars. Everyone is busy. I get it. You get it. People want to know how much of their valuable time is going to be diverted toward an activity that is not going to contribute to their h-index.

So I’m going to try to answer that question in this blog post.

The most honest answer is: it depends. People vary wildly in their abilities to craft a compelling story, to visualize how to tell it, and to operate the recording equipment and editing software. The actual amount of time you will spend will depend on your skill level at using the equipment and software required for making a video. If you’ve never used movie editing software, then it’s going to take you longer to edit your clips compared to someone who’s played around with iMovie, for example. The same goes for designing and filming.

Consequently, I’m going to give some ballpark estimates based on a relatively inexperienced person–someone who typically takes a video-making workshop.

In my workshops, I’ve found that people can generally design their video (overall story and how to tell it) in an hour or so, especially if they are given a template to follow. Filming can take a couple of hours or days, depending on your topic, length of the planned video, and where you need to film. Workshop participants, working in pairs and using smartphones or tablets, were able to film the main segments of their 3-minute video in two to three hours. Another hour might be spent shooting B-roll or searching the Internet for video clips, animations, photographs, maps, and illustrations to augment the filmed segments. After a brief tutorial, editing might take another couple of hours.

Based on these estimates, the total time required to produce a rough cut is six to seven hours. Another couple of hours will likely be needed to polish or reshoot problematic clips. In other words, plan on spending (at a minimum) the equivalent of an entire day making your video.

As you gain experience, though, you will find that you can use your phone to shoot and edit a video on the fly. For example, when you are conducting fieldwork, it’s easy to shoot brief clips that are immediately imported into an editing program such as iMovie. While waiting for your electrodes to equilibrate or for sample bottles to incubate, you can do some trimming and editing of those clips. I can take this approach while on a field trip and have one or more videos ready to upload by the end of the day. See this example that I filmed with my iPhone:

Before I went to the site, I spent some time searching the Internet for information about the mangroves growing in the region. Armed with that information, I began planning the video (in my head) during the drive to where this mangrove stand was located on Yakushima. I spent around two hours at the site filming various aspects of the mangrove stand and jotting down notes about some of the plant characteristics I observed. I started editing this video on my phone with the iMovie app for iOS while I was on site and could retake any clips that needed improvement (I had to reshoot the segment in which I spoke several times).

As the story began to crystalize, I walked around shooting B-roll to illustrate important points to be made. By the time I was ready to leave, I had a rough cut of the video finished and ready to polish. After returning to my hotel room, I added voice-over to the video and also some images of maps and other items that I had to download or modify using my computer. Making this video was fun and informative and made the excursion to see this unique stand more memorable.

How long does it take to make a video? For me, the answer doesn’t really matter. What’s important is that I’ve made a video and, in the process, learned something new.

Try Tweeting A 30-Second Video of Your Science

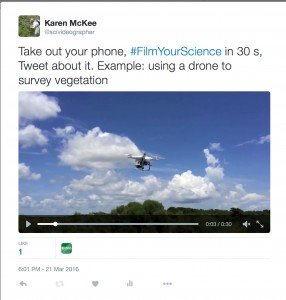
I recently posted this Tweet:filmyourscience

The idea is to encourage scientists to film some aspect of their research and share it through social media. Many scientists now have a smartphone that will shoot video. The incredible quality of phone cameras and ease of filming with them allow anyone to capture footage with minimal fuss. At the same time, some scientists and especially students are increasingly using Twitter to interact and share information.

I think that Twitter, which allows brief video clips (maximum length = 30 sec) along with a text message, is perfect for quickly sharing something you’re doing in the lab or an interesting observation you’ve made in the field. Using a hashtag (#FilmYourScience) helps identify tweets related to the topic.

I think such an effort has many benefits…for scientists as well as the scientific community.

  • Filming and sharing 30-second Tweets is a great way to learn how to shoot a video as well as to use social media to share science.
  • By learning to film and share videos of research, scientists will become more comfortable with the medium and see how effective video can be.
  • Sharing brief insights or observations via Twitter is an easy way to engage the public.
  • Showing what scientists do and where they work will help dispel some of the stereotypes about our profession.
  • Tweeting brief videos is a great way for a young researcher to increase their visibility and perhaps to find future collaborators.
  • Seeing and hearing about the various interesting things scientists do and where they work will encourage students to consider science as a career.

Here are brief instructions how to go about recording a video on a smartphone for a Tweet:

  1. Tap the Tweet icon to open a new message.
  2. Tap the camera icon.
  3. Tap the video icon, which will access the video camera.
  4. Record a video by holding down the record button. More clips can be added by pressing again. Record up to 30 seconds (you’ll get a warning when this limit is reached).
  5. Review clip by tapping it. Trim by dragging end bars. Reorder clips by dragging.
  6. Tap Done when finished.
  7. Add a text message to explain your video.
  8. Tap Tweet to share.

You can also import a previously recorded video from your device’s media library. These can be trimmed to 30 seconds in Twitter. To stop the video from autoplaying in your Twitter timeline, go to Settings>Data>Video>Video autoplay and change the setting.

Finally, here is a video tutorial showing how to attach a video to a Tweet (direct link):

Use Video to Enhance Class Lectures

Video is a fantastic way to augment class lectures and let students see examples of habitats, organisms, and various physical/chemical/biological phenomena. Instead of just listening to a lecture about mangrove forests, students can go on a virtual field trip by watching a video. Quite a few educators are now using videos routinely to illustrate scientific concepts. The number of videos suitable to accompany science lectures is growing (here is a great list of videos for teaching ecology). Many of these are produced by professional filmmakers, but some are created by science practitioners and students.

Ecologists who work in different types of ecosystems and study various processes can make an important contribution to science education by making short documentaries (three to five minutes) focused on a particular topic. You may be doing research in an alpine forest, a grassland, or a coral reef. Or, you may teach a field course in a tropical rainforest or a desert. By shooting some footage and putting it together with a brief explanation, you can provide a unique insight into that ecosystem. If you get into the habit of creating short videos during such excursions, you will eventually build up a library of footage to augment class lectures. Students who take field courses or who are conducting field research can also produce informative videos in which they share their experiences and insights with other students or the general public.

I recently visited a unique ecosystem in southern Japan and decided to make a short video about it. I spent about two hours at the site shooting footage with my iPhone (attached to a monopod). I would have spent that much time anyway taking photos and just exploring the site. I additionally spent about five hours over the subsequent three days editing the clips (with iMovie) and incorporating information from the literature. Whenever I had a few minutes during my travels (waiting for a plane or bus), I trimmed the footage or searched the internet for information to include in the video. I did most of the initial editing on my iPhone, but finished the video on my computer using the desktop version of iMovie.

The resultant 4.5-minute video would be suitable to show in a lecture about climate controls on plant distributions or a more specialized lecture about mangrove ecosystems.

Now, some of you may be hesitant to make such a video, thinking that it will take a lot of time or will never be as good as professional science documentaries. Well, your videos don’t have to be of BBC quality to be effective. Also, you don’t need fancy equipment or a film studio to produce an informative and high-quality video. I used an iPhone 6 to film this video, which was rendered in high definition (1080p). As I’ve mentioned in previous posts, the iPhone is easy to use to capture video, especially if you know a few basics. Movie-editing is also quite easy with applications such as iMovie. Video-sharing sites allow creators to easily upload their videos online where they are readily shared with others.

The main point here is that with a little effort, I was able to create a mini-documentary about a topic of interest to students and researchers studying mangrove forests. Students may read about the distributional limits of mangroves, but text descriptions are dry and often not very interesting. A video, on the other hand, takes the viewer across oceans to a remote site they will likely never have the opportunity to visit and creates a memorable example of mangroves growing near their northernmost limit. The video is also understandable by non-specialists who might travel to southern Japan and want more information about unique coastal vegetation found there.

Blocked

The_Great_Wall_of_China_at_Jinshanling-edit“If you open the window for fresh air, you have to expect some flies to blow in.” That was a favorite saying of Deng Xiaoping, who was referring to China’s economic reform that would ultimately transform the country. China’s decision to open its doors to foreign investment and western knowledge also let in the Internet and foreign ideologies. To keep those “flies” away, the Chinese government has implemented The Great Firewall of China—an Internet censorship and surveillance program.

I’m currently in China where access to social media (Twitter, Facebook), YouTube, Google, and many other sites is blocked. A number of media sites such as CNN and the New York Times are also blocked (you can test whether a website is blocked by using https://www.comparitech.com/privacy-security-tools/blockedinchina/ Update 5/25/16: if previous site is unavailable, try this one https://www.vpnmentor.com/test-the-great-china-firewall/). Not only that, the government surveillance encourages self censorship because Internet users believe they are being watched and could potentially suffer legal and economic consequences if they do not adhere to the government policy. The blockage of sites I take for granted at home means I cannot (easily) get to my g-mail, Twitter, and YouTube accounts. In addition to the inconvenience, such censorship is quite disturbing to someone accustomed to Western freedoms and beliefs.

The irony is that it’s possible to jump over the Great Firewall, and many people here do. How that’s accomplished requires an understanding of how the Great Firewall works, which is technically quite interesting. There are three main ways Internet access to certain sites is blocked. The first is IP Blocking, which works by blocking all access to a known IP address. For example, www.facebook.com (a domain) maps to a known IP address; any attempt at connection is immediately disconnected (I would get messages saying that the server was unavailable, or the connection attempt would time out). The second way is called IP Address Misdirection, which does exactly what the name suggests. You might type in a url, www.lsu.edu, but the Firewall will send you to a fake address, www.misdirected.lsu.clone.edu. The final method is called Data Filtering, in which an Internet search involving certain keywords (e.g., Tiananmen Square) will be intercepted and the content of the resulting URLs examined. If the URL is on the censored list, then access to that site is blocked.

Through the use of VPNs (virtual private networks) and other proxies, Chinese citizens and visitors like me can circumvent the firewall. These work by routing information through a server located elsewhere, for example, California. Your IP address is thus changed so that it appears you are located in the US, and your web activity is also encrypted. This change bypasses the various blocking procedures described above. However, Chinese authorities have begun identifying and blocking some of the more popular VPNs, making it a bit more difficult for the average person to jump the firewall. I found one that is currently working and is allowing me to (so far) post things on banned sites such as Twitter.

I knew about the firewall prior to this trip (having visited China before) and had assumed that Chinese viewers were unable to see my YouTube videos. Chinese colleagues also had mentioned to me that YouTube was not accessible in China. I now know that is not entirely true. In fact, a friend who is from China but lives in the US said that her friends back home told her about “The Scientist Videographer” and video tutorials. They were talking about using a GoPro to capture video, and her friends mentioned a tutorial showing how to shoot and edit a slow-motion video, which showed a hummingbird. After a moment’s confusion, she realized they were talking about someone she knew—me and my YouTube tutorials.

There is much, much more to this topic (see this NY Times article for an in-depth description) than I could cover in a brief post.

Image Credit: Wikipedia Creative Commons CC-BY-SA 3.0, uploaded by Brandmeister

Use Video to Share Your Dissertation Research

Increasing numbers of scientists and graduate students are posting videos that show various aspects of their research—in the laboratory and the field. Such videos serve many purposes, both for the researcher and for society. Take a look at this example and then we’ll talk about the benefits of making such a video.

Videos that depict scientists and students doing their research can have multiple benefits—both for the individual researcher, as well as for society.

1. Raise visibility. Early career scientists struggle to make a name for themselves in their chosen field. The traditional approach is to publish in journals and to present at science conferences. Those forms of formal communication of science are still important, but now there are additional tools that scientists can use to share their work: social media, science blogs, and videos. The video example above highlights the dissertation research of a Ph.D. student at Charles Darwin University, Mike Miloshis, who is studying how sea-level rise is changing the wetlands along the Mary River. Well-done videos like this can be used by the student or by the student’s department or university to more easily share their work with prospective employers or funders, policy-makers, the media, and the general public.

Only a handful of people will likely read your dissertation, but many more will be willing to watch a video showing what you did, how you did it, and why it’s important.

2. Solicit funding. Video is an excellent way to explain your research to prospective funders—particularly people without a science background. Crowd-funding platforms are springing up that require investigators to submit their research proposal in the form of a brief video. Members of the scientific community and the general public watch the videos and pledge a donation or vote for those projects they wish to support. One example is Thinkable, which just awarded $5,000 (AUD) to an Australian cancer researcher and is about to award almost $15,000 (AUD) in another competition based on submitted 3-minute videos.

Those students and established scientists with video skills are at a clear advantage in such competitions.

3. Augment a CV or resume´. Video is an effective and efficient way to share information about a researcher’s unique interests, skills, and accomplishments. A video can paint a picture that is more distinctive and memorable than a written description in a resume´ or on a website. In a few short minutes, the video above showed this researcher’s general knowledge of his topic and ability to communicate it, as well as his expertise with various types of scientific equipment. Because it’s visual, video makes that information more memorable. It’s especially effective at getting across intangible qualities such as enthusiasm, confidence, energy, creativity, eloquence, and humor.

See this post for more information about making a video resume´.

4. Recruit students. A video can not only solidify a distinctive image for a researcher, it can serve as a great recruiting tool for an academic looking to attract students or post-docs. The video above depicts what it’s like to do river research and explains why the topic is important to study without getting too bogged down in scientific details. In a broader sense, such videos can show other students what graduate research is like in a particular field and what some of the challenges are.

By encouraging students to make videos about their experiences, schools can attract prospective students and help them anticipate what they will face in graduate school.

5. Inform the public. In addition to benefits for the individual researcher, videos can simultaneously inform the public about the importance of a research topic and the nature of scientific research. The average person is curious about science but may view it as a mysterious process conducted behind closed doors by socially awkward, introverted, cold, mad, obsessive, [insert your stereotype] people. Many envision a lab-coated, old guy toiling away in a laboratory.

Videos like the above example show that research is carried out in all kinds of environments and by perfectly normal people. In other words, videos can help put a human face on science.

How do you create a video to portray your dissertation research? You have a couple of options: join forces with a videographer or do it yourself. The video example I’ve highlighted in this post was a joint production between the graduate student and a videographer friend. If you are studying at a university, try approaching someone with multimedia skills.

If that doesn’t work out, you can make the video by yourself or perhaps with the help of a fellow student or your advisor. Making videos is now quite easy with mobile devices that shoot HD video and simple-to-use yet powerful movie editing software. A smartphone is truly all you need these days to create a professional and effective video to share your unique qualities with others.