This is the first post in a series about Artificial Intelligence (AI) and how it might help scientists be better communicators. In this post, I introduce the topic.
Consider this futuristic scenario:
A scientist is working on a grant proposal and must create a three-minute video synopsis of what she plans to do with the funding and how her research will benefit society. This video synopsis is one of the required components of proposals submitted to government funding agencies. She logs onto a platform in the Cloud and uploads video clips showing her and her team working in the laboratory and talking on camera about the potential applications of the proposed research. An AI (Artificial Intelligence) system analyzes all of the uploaded information, as well as millions of images, animations, and video clips in the public domain. Within minutes, the AI system has identified the key components necessary to address the stated goals of the funding opportunity and has produced a draft video of the required length that is both intellectually and emotionally stimulating. The scientist takes the draft video file and makes a few edits based on her knowledge of the field and potential reviewers. She renders the final video and attaches it to her application package, which she submits to the funding agency. Her proposal is funded, and the funding agency uses her video synopsis on their website to inform the public about the research they are supporting and how it may affect them.
Far-fetched? Perhaps not. Recently, I was watching an episode of GPS in which Fareed Zakaria interviewed the CEO of IBM, Ginni Rometti, and my ears perked up when they talked about an AI helping a film editor cut a movie trailer, reducing the time required from weeks to a day. The movie studio, 20th Century Fox, recently collaborated with IBM Research and its computer Watson to produce the first computer-generated movie trailer for the science fiction film Morgan, which is about, appropriately enough, an artificially enhanced human.
Watson was trained to “understand” what movie trailers are and then to select key scenes from the full-length movie to create a trailer that would appeal to movie-goers. A similar approach could be applied to scientific information to produce a video proposal that resonates with peer reviewers and panelists, as in the hypothetical example above….or a video abstract to inform the scientific community about a recent journal article. The idea here is that a busy scientist may one day be able to use AI to rapidly scan a vast storehouse of data—much faster and more thoroughly than a human—and then to suggest the best material and design for an information product such as a video.
AI is being considered as a way to enhance many activities involving the analysis of large amounts of data—such as in the medical or legal fields. Using AI to create movie trailers or science videos may seem to be a trivial goal compared to making a more accurate medical diagnosis; however, when you consider how important it is for science professionals to be good communicators, the idea seems worthwhile. In the coming posts, I’ll explore this topic further and provide a bit more detail about how IBM’s Watson was used to create a movie trailer.
This post is part of a series about Artificial Intelligence (AI) and its potential role in science communication. In the next post (part 2), I’ll provide more information about Watson, the computer.
Unless you’re a member of the most isolated tribe on Earth, you probably know that we’ve all become potential reporters, capable of shooting video of unfolding events with our phones and instantly sharing it with the world through the Internet. New technologies have given the average person the means and the inspiration to chronicle and share their observations with a global audience. Citizen journalists have documented street demonstrations, natural catastrophes, political uprisings, wars, police shootings, and terrorist attacks. No longer bystanders, people are getting involved by capturing video that becomes key evidence in investigations, that informs search and rescue operations, and that provides spontaneous, person-on-the-street viewpoints. The massive contribution of these amateurs can be seen at CNN iReports where more than 100,000 people posted their stories in 2012.
An increasing number of science professionals are also interested in reporting on their experiences conducting field research as well as at conferences and other scientific gatherings. Some people tweet about talks they heard or about a workshop they attended at a meeting. Conference attendees can become reporters through blogging and vlogging, which is blogging through the medium of video. Vloggers capture footage of various conference activities, such as poster sessions, provide commentary about some aspect of the conference, or interview other attendees about their research. Despite some reservations about premature dissemination of unpublished research through live tweeting and blogging, many conference organizers welcome these new reporting methods because they raise the visibility of the conference and generate excitement in attendees. Small conferences in particular can benefit from these activities.
In this post, I would like to focus on one of the most difficult tasks for the scientist videographer. And that is: interviewing other people. Conducting interviews on camera is always difficult, but trying to interview someone at a conference is particularly challenging because of all the noise and distractions. I recently attended a small conference (~300 people) and conducted a series of video interviews with the conference organizers, sponsors, and attendees. My overall goal was to produce a short video that explained what the conference was about, why the topic of the conference was important, and who some of the attendees were. I wanted to see if I could accomplish this by myself using a simple recording setup: my iPhone (6) and an inexpensive lapel microphone. The end result was a bit longer than I intended, but it pleased the conference organizers who posted it on the conference website. Check it out (direct link) and then I’ll talk about some of the pros and cons below.
The following are some tips that I gleaned from the experience:
First, decide on the objective and length of the video and stick to it. This tip may seem obvious, but often videographers reporting on an event such as a conference will not have a clear objective in mind. The result is a meandering video that fails to send a clear message. In my video, I had been asked by the conference organizers to shoot a video that basically explained the purpose of the meeting and that featured some of the organizers, sponsors, and attendees. In other words, I was somewhat restricted in the “story” I could tell. I also needed to keep the video brief. My target length was under five minutes, which I overshot. However, the organizers liked everything I included, so the final length turned out to be fine. I shot a lot of extra footage (answers to some spontaneous questions) that I would have loved to include but couldn’t without making the video drag on too long. If I had set out to do a video about mangrove researchers and what challenges they face, I would have used that extra footage. However, I was committed in this case to making a video about this particular conference. If you find yourself struggling for a topic, consider asking a single question of a particular segment of conference-goers such as, “Is this your first scientific conference? If so, what are you finding most surprising or interesting about the experience?” or “What one piece of advice would you give to students and early-career scientists about giving their first oral presentation?”
Select interview subjects carefully. When it comes to interviewing, you will likely have to deal with a variety of people: some who shine on camera and others who ramble or have distracting mannerisms. Also, most people become a little nervous and stiff when on camera.
One way to deal with this problem is to carefully select your interview subjects—if possible. I tried to select people to interview who seemed to be articulate and able to answer my questions without too much rambling. In some cases, I knew the person and was confident they would perform well on camera. In other cases, I watched people deliver their conference talk and, based on their delivery, decided whether they would be good interview subjects. In a few cases, I spoke with people beforehand to get an impression of how they would be on camera. In my case, I had a secondary objective in selecting subjects. I wanted to use people who would be good interview subjects but I also wanted be challenged by interviewing people who had no prior experience on camera. I wanted to see if I could still get useable footage from people who were extremely nervous or had other on-camera issues. I found that I could get decent footage from everyone I interviewed if I just kept filming and asking questions until I got something good.
Sometimes, the scientist videographer is restricted with respect to choice of interviewee. If you are making a video of a small workshop, for example, you are limited by the people who are in attendance. They all may have varying levels of difficulty speaking on camera and so you must work with what you have. The best way to deal with this is to try to put the interview subjects at ease by asking them easy questions first, ones that they should have no trouble answering quickly and concisely. Also, you can begin by just having a conversation with them and then turn on the camera after they have relaxed.
At an international conference, you may need to interview people whose native language is not English or who have strong accents. One solution is to prepare and upload a word-for-word transcript along with the video, which can be used for closed captioning. Viewers who have difficulty understanding an interview subject can turn on closed captioning and read the transcript.
In general, if you are covering a large gathering like a conference, it’s a good idea to interview as many different types of people as possible. For this particular video, I wanted to have a good cross-section of people: conference organizers, sponsors, and attendees; established scientists, early career scientists, and students; male and female; people from different countries, not just the U.S.; and people working in different subfields.
Ensure quality audio. Dealing with ambient noise at a conference is probably the biggest challenge for the scientist videographer. On the one hand, you want your interview subject to be clearly heard without distracting noises. On the other, shooting the interview in a crowd of people helps convey the reality and excitement of the conference. I tried a couple of approaches: interviewing people in a noisy poster session as well as outside the venue (either outdoors or in a quiet foyer). I found it easier to interview people in the quieter settings. They had less trouble hearing my questions, and there were fewer distractions for both me and my subject. But these quieter interviews did not have the same energy as the ones captured in the thick of things. In this case, the lapel microphone did a great job of recording the subject’s voice, which is heard clearly above the background noise.
Choose an appropriate backdrop. In general, you want to avoid interviewing people against a blank wall or in front of a window or bright lamp. Also, you want to avoid a situation in which people can walk behind your subject—because the viewer’s attention can be distracted by what is happening in the background. In my interviews, I tried out a variety of backdrops, including conference or institutional posters and blank walls. As you can see in my video, the footage shot in front of a poster or other colorful background worked best. Getting the right combination of backdrop and good audio can be challenging, however.
Avoid the “talking heads” syndrome. The best way to bore a viewer is to show a series of interviews in which the frame never deviates from the head and shoulders of the subjects. Even though the subject may be talking about something really interesting, the viewer’s eyes tell them nothing is happening. Instead, use cutaways to show what the interview subject is talking about. By frequently changing the view, you will add interest to your video. In my video, I used footage and images of mangroves and the conference from my personal library to augment the video interviews.
Prepare interview questions beforehand. Think carefully about what questions you want to ask and have them on hand during the interview. As you saw, I started with a question about what the conference was all about. Next, I asked why the viewer should care about the conference topic: mangroves. I posed that question to someone I knew had extensive experience in many different countries and got a great answer. I next asked why this particular conference was important. That question elicited information from organizers and sponsors about the level of global interest in mangrove science. I then asked attendees to describe their particular topic of research that they were presenting at the conference. Here, I wanted to show how varied the research topics were as well as how varied the researchers themselves were. For example, I interviewed one of the plenary speakers, people who gave regular talks, and students presenting posters. Their answers provided a broad picture of research topics being reported at the meeting and also showed people at various stages in their career. Finally, I asked all of my interview subjects how they first became interested in mangroves, which prompted a variety of interesting, personal responses that told the viewer something about what motivated these scientists to study mangroves. Don’t restrict yourself to prepared questions, though. If you think of an off-the-cuff question during the interview, ask it. Such spontaneous queries often elicit the most interesting answers.
Use camera equipment that is easy to carry, set up, and use. Filming at a conference is really difficult, especially if you also wish to attend the sessions. Using a setup that can be carried in a purse or backpack really simplifies the process. As I said above, I used my iPhone and an inexpensive lapel microphone to conduct the interviews. Having been interviewed by news reporters using only their cell phones to record, I knew that this was an approach used by professionals. This approach made it really easy for me to attend the sessions and then quickly set up during the breaks for the interviews. Basically, all I had to do was plug the mic into my phone and clip it to the subject’s shirt…and I was ready to film. In some instances, I attached my phone to a selfie stick, which helped me stabilize it and also position it to frame my subject correctly.
Review footage (both video and audio) immediately. It’s good practice to do a brief check of your equipment before starting each interview. I usually do this by myself–I simply clip the mic to my shirt and turn the camera on myself. If I’m going to interview in a noisy poster session, for example, I’ll record a brief clip of my voice to make sure it’s audible above the background noise. When you finish an interview, it’s a good idea to review your footage to ensure there are no technical problems. I always take a quick look and listen while I’m still with the interview subject. In one case, I discovered that I had somehow tapped the record button twice, so that I failed to record anything at all. I was able to quickly redo the interview.
Use movie-editing software to edit the interview footage. In interviews, you will capture a lot of footage that is unusable. Editing is essential to remove or minimize bloopers, shaky clips, loud noises, and other problematic footage. Subjects who are nervous tend to ramble and may also string together sentences without a break between, making it difficult to cut and splice footage. Sometimes, it’s necessary during the interview to ask the subject to pause a few seconds between sentences. These pauses will let you more easily extract short statements without cutting off the speaker mid-word. Once you have removed unusable parts, you then need to cut further. Resist the temptation to include everything you filmed. Also, avoid long sequences of one person talking. Edit the footage so that the scene changes frequently. I partially accomplished this by asking a question (in a text title) and then showing a series of clips of different subjects answering each question. I’ve already mentioned the use of cutaways to augment an interview—these cutaways will really help the viewer stay engaged and interested in what the interview subject is saying.
Video is a fantastic medium for the communication of science. However, it’s not an easy medium to master, especially for science professionals who are not typically trained in filmmaking techniques. I’m not talking about the technological challenges of using audiovisual equipment and software, though. I’m talking about how to design a video that others want to watch.
When I first began making videos about my research, I approached the process like a scientist rather than a filmmaker. My natural inclination was to communicate the way I had been trained as a science professional. We are taught to communicate by presenting a logical series of facts and findings, supported by data—lots of data. We are also taught, in the interest of accuracy and precision, to include excruciating detail—all the uncertainties and limitations of our findings. And, we must look and sound serious when delivering a science message—otherwise, our colleagues won’t find us credible. This approach may work just fine with our peers but does not necessarily work for other audiences. In fact, it often fails miserably with the general public.
In the beginning, it never occurred to me that I needed to look at things from a filmmaker’s viewpoint rather than from a scientist’s viewpoint (this insight continues to be the one that most surprises and confounds the science professionals who attend my workshops and webinars). But over time, I gradually realized that using video as a communication tool required me to meet the video viewer’s expectations, which is different from someone reading an article or listening to a conference presentation. This is true even if the viewer happens to be a scientist with specialized knowledge of the topic. We all interact with videos in the same way. In addition to gaining information, we expect that information will be delivered in a certain way—one that doesn’t bore us to tears. Too often, though, that information is presented like a bad-tasting medicine (take this, it’s good for you). Not surprisingly, few people want to watch.
OK. This is one of the more popular videos on the Veritasium channel: 8,967,145 views since its posting February 24, 2014. That works out to an average of about 10,400 views per day. Many of his other videos have similarly received millions of views; one has almost 33 million views. The popularity of the overall style of Veritasium’s videos is further evidenced by the number of subscribers to the channel: more than 3.5 million people. So I think it’s safe to conclude that these videos are very popular and that the channel has succeeded in reaching a lot of people.
What specific features set Veritasium’s videos apart—features that you might employ to improve your science videos? Here is my analysis:
Lead with Awesome. A lot of science videos, especially those created by scientists, start out with a long, boring exposition. In contrast, most of the videos on Veritasium start with a bang. Little time is spent at the beginning explaining or introducing the scientific concept to be featured in the video (that information is provided later). The videos on the Veritasium channel typically open with a “hook” such as a question, an intriguing observation, or an amazing demonstration. In other words, the video gets right to the point in the first few seconds. The video, “2, 4, 8” is a good example. In the first ten seconds, the video asks if you can figure out the rule behind the number series. Also, notice that no time is wasted on awkward introductions of the people in the video, including the host, Derek Muller.
Challenge Misconceptions Carefully. Many of Veritasium’s videos try to correct common misconceptions about scientific concepts, but in an indirect, non-threatening way. A direct approach might have a scientist on camera list common misconceptions and explain why they are wrong. This tactic is often not effective, partly because the viewer may feel that they are being “talked down to” or lectured by someone with superior knowledge—and they become more resistant to hearing the truth. Instead, Muller interviews average citizens on the street to get them to reveal common preconceived notions or misunderstandings about a particular subject. The expert then leads everyone, including the viewer, to the correct answer. In “2, 4, 8”, we see a series of people struggling to figure out what “rule” Muller has in mind. The viewer can’t help but play along. The outcome is that instead of being a passive receptacle for information, the viewer becomes an active participant in the exercise that eventually reveals the answer to the puzzle. The expert (Muller) then explains (briefly) the significance of the exercise.
Don’t Over Polish. I think people are turned off by “shock and awe” science videos that contain over-the-top animations and are produced at great cost by film studios. One reason may be that such videos seem to be desperately trying to get the viewer’s attention with special effects rather than relying on the awesomeness of the science. The Veritasium videos are technically sound, but not “slick”, and one gets the idea that these are low-budget productions. In the “2, 4, 8” example, the video was shot on the street by Muller’s mother who operated the camera. Such unpolished videos appeal to many viewers and may even enhance their admiration of them.
Be as Brief as Possible. Most of the videos on the Veritasium channel are brief—just a few minutes in length—enough time to get across the basic concept without trying the viewer’s patience. The “2, 4, 8” video was just under five minutes. But there is no perfect length. A video should be as long as necessary to get across the message. The scientist videographer is often tempted to cram in more details, but too many details can obscure the message. The “2, 4, 8” video could have included much more information about the scientific method, but this would have been overkill. We just don’t need a long lecture about confirmation bias or Karl Popper to “get the no”.
Keep the Viewer’s Interest. Veritasium videos, including “2, 4, 8”, are designed so that the viewer gets invested in watching the entire thing. The longer you watch, the more interesting things you get to see and hear about. As a viewer, you are interested not only in the answer to the riddle but whether you can figure out the “rule” before any of the people Muller is interviewing. If you figure out the rule early in the video, you continue watching to see if you are correct and also how long it takes the other people. If you don’t figure out the rule, you continue watching to see what the answer is. Either way, you’re hooked. Check out the comments below the “2, 4, 8” video. Many commenters talked about whether and when they figured out the answer.
Oh, I almost forgot the most important aspect of these videos: they are fun to watch! Here’s one more from Veritasium to illustrate the point:
It was the third day of the conference, and we had just finished a walking tour of a local mangrove forest and shoreline at Ludmilla Bay, north of Darwin in the Northern Territory, Australia. Everyone was hot, thirsty, and sweaty as we filed into the air-conditioned auditorium at Charles Darwin University for the “Muddy Mangrove Movie-Fest”. We were about to be treated to a viewing of several videos made by researchers, conservation groups, and independent filmmakers–all focused on the topic of the conference–mangroves.
Earlier this month, I had traveled back to Australia to attend another meeting of the Australian Mangrove and Saltmarsh Network. The previous year I had been invited by the organizers to give one of the keynote talks. My presentation was titled “Communication Tools and Strategies for the 21st Century Scientist” in which I encouraged students and scientists to consider using the new media (blogs, video, social media, etc.) to share their work more widely within and beyond the scientific community.
Apparently, the attendees of the 2015 AMSN conference liked my message because they started planning a movie-fest for the next meeting that I was now attending in Darwin. The Muddy Mangrove Movie-Fest was opened by acknowledging me as the inspiration for it. I was thrilled to have been able to motivate others to go out and make videos about mangroves and mangrove research. Even better was to be present for the official screening of those videos at the 2016 AMSN conference.
You can see the list of videos that were screened in the image at left. Not all of the Muddy Mangrove Movie-Fest videos are online, but some are. In fact, I had already seen and highlighted on this blog (Use Video to Share Your Dissertation) one of these videos (not knowing that it was to be featured at the Darwin conference).
I met the Ph.D. student, Mike Miloshis, featured in that video (Rise of the Mary River) at the Darwin conference earlier in the week. He came up and introduced himself and asked, “Aren’t you the Scientist Videographer?” I laughed and said that I certainly was. Then it hit me that I was talking to the student in the video I had critiqued on this blog.
As the lights dimmed and the first video began, I thought, “What a great idea–having a session at a science conference featuring videos created by attendees about their research.” Some of the videos were informative, some were inspirational, and some were funny. But the audience seemed to enjoy all of them. I know I did.
Here are the Muddy Mangrove Movie-Fest videos that are online (if anyone knows where the others are posted, please let me know):
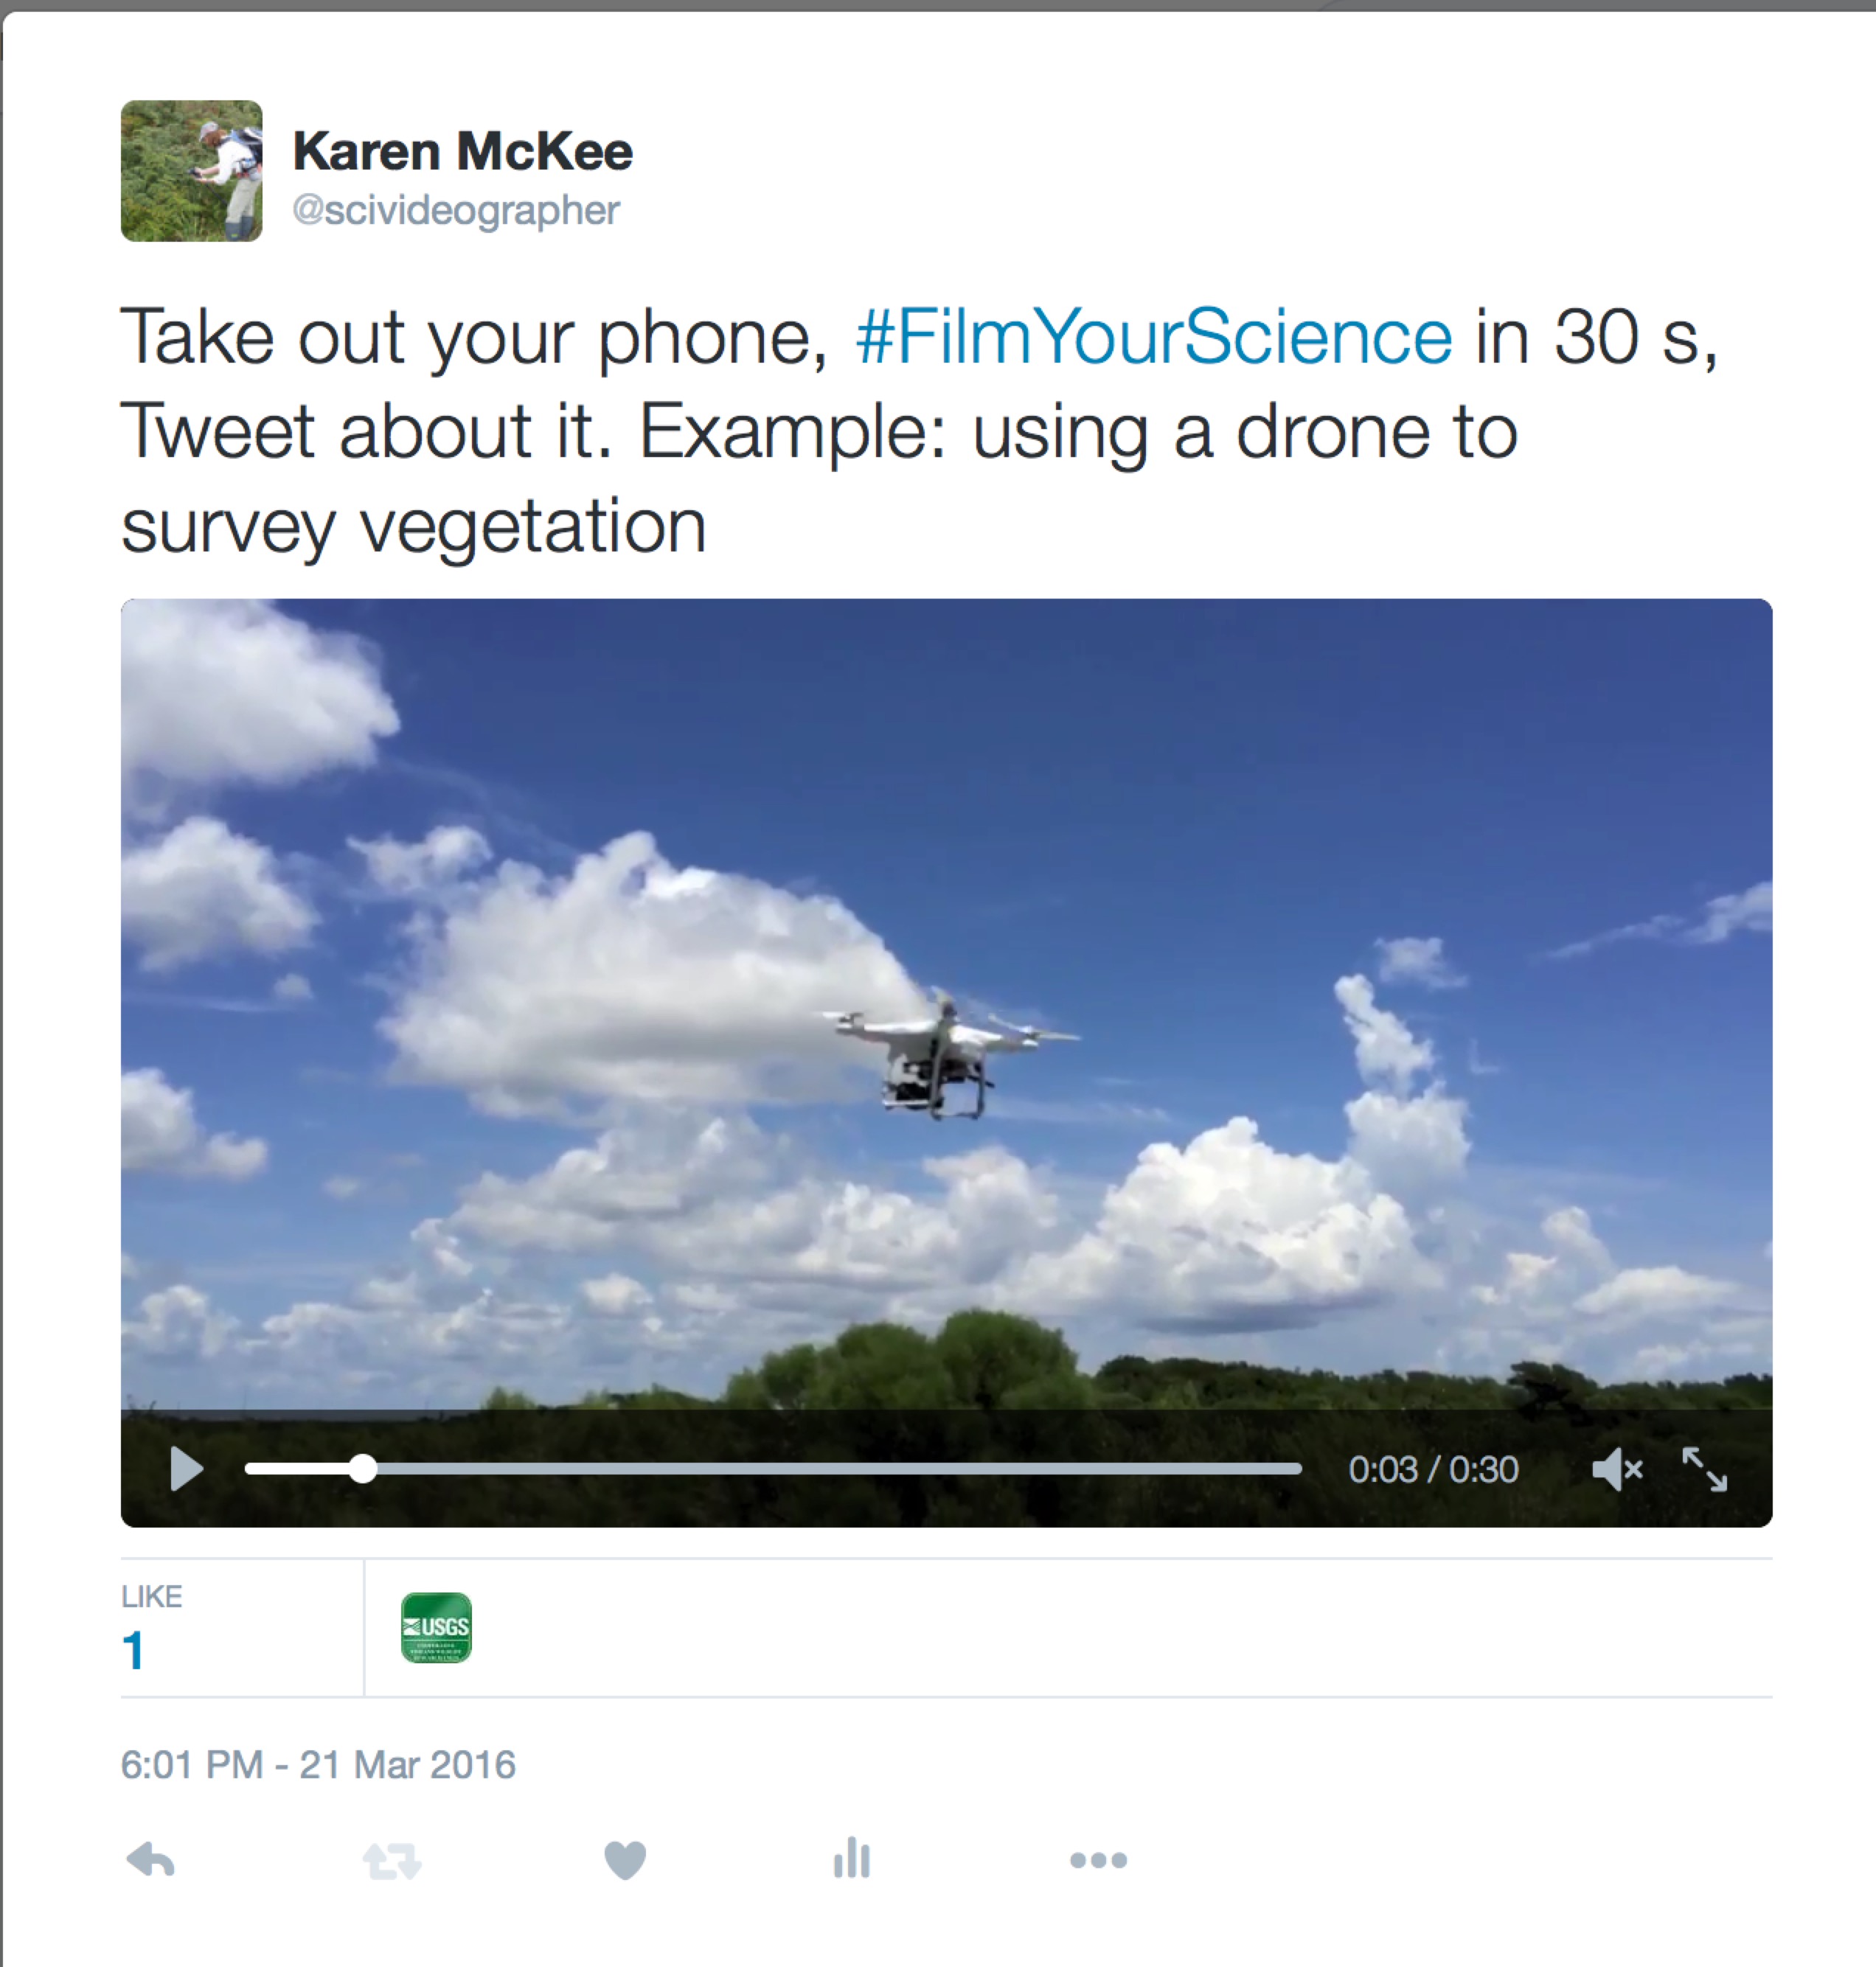
The idea is to encourage scientists to film some aspect of their research and share it through social media. Many scientists now have a smartphone that will shoot video. The incredible quality of phone cameras and ease of filming with them allow anyone to capture footage with minimal fuss. At the same time, some scientists and especially students are increasingly using Twitter to interact and share information.
I think that Twitter, which allows brief video clips (maximum length = 30 sec) along with a text message, is perfect for quickly sharing something you’re doing in the lab or an interesting observation you’ve made in the field. Using a hashtag (#FilmYourScience) helps identify tweets related to the topic.
I think such an effort has many benefits…for scientists as well as the scientific community.
Filming and sharing 30-second Tweets is a great way to learn how to shoot a video as well as to use social media to share science.
By learning to film and share videos of research, scientists will become more comfortable with the medium and see how effective video can be.
Sharing brief insights or observations via Twitter is an easy way to engage the public.
Showing what scientists do and where they work will help dispel some of the stereotypes about our profession.
Tweeting brief videos is a great way for a young researcher to increase their visibility and perhaps to find future collaborators.
Seeing and hearing about the various interesting things scientists do and where they work will encourage students to consider science as a career.
Here are brief instructions how to go about recording a video on a smartphone for a Tweet:
Tap the Tweet icon to open a new message.
Tap the camera icon.
Tap the video icon, which will access the video camera.
Record a video by holding down the record button. More clips can be added by pressing again. Record up to 30 seconds (you’ll get a warning when this limit is reached).
Review clip by tapping it. Trim by dragging end bars. Reorder clips by dragging.
Tap Done when finished.
Add a text message to explain your video.
Tap Tweet to share.
You can also import a previously recorded video from your device’s media library. These can be trimmed to 30 seconds in Twitter. To stop the video from autoplaying in your Twitter timeline, go to Settings>Data>Video>Video autoplay and change the setting.
Finally, here is a video tutorial showing how to attach a video to a Tweet (direct link):

 A scientist is working on a grant proposal and must create a three-minute video synopsis of what she plans to do with the funding and how her research will benefit society. This video synopsis is one of the required components of proposals submitted to government funding agencies. She logs onto a platform in the Cloud and uploads video clips showing her and her team working in the laboratory and talking on camera about the potential applications of the proposed research. An AI (Artificial Intelligence) system analyzes all of the uploaded information, as well as millions of images, animations, and video clips in the public domain. Within minutes, the AI system has identified the key components necessary to address the stated goals of the funding opportunity and has produced a draft video of the required length that is both intellectually and emotionally stimulating. The scientist takes the draft video file and makes a few edits based on her knowledge of the field and potential reviewers. She renders the final video and attaches it to her application package, which she submits to the funding agency. Her proposal is funded, and the funding agency uses her video synopsis on their website to inform the public about the research they are supporting and how it may affect them.