Field Testing a Phantom II Quadcopter for Scientific Research

When was the last time you had fun doing field research? What’s that you say? Not ever? Then you probably haven’t tried using a quadcopter yet.

A quadcopter is a remotely-operated, miniature helicopter that is lifted and propelled by four rotors. These unmanned aerial vehicles (UAVs), commonly called “drones”, can carry high-definition cameras that are able to capture spectacular aerial video at a fraction of the cost of a full-sized helicopter rental. Quadcopters are increasingly used by business owners such as sports photographers, wildlife photographers, hunters (feral pig spotting), travel agents, and real estate agents (although commercial use of these aircraft was ruled illegal by the FAA in the US). Scientists are just getting started finding ways to use UAVs in field research such as these agriculture researchers.

takeoff_gopro_2-cine


Last week, I had an opportunity to go out with some colleagues who were testing one, specifically a Phantom II sold by DJI. As you will see in the video, my colleagues are using the quadcopter to acquire low-altitude video of some coastal ecosystems, which can often be remote and/or difficult to traverse on foot.

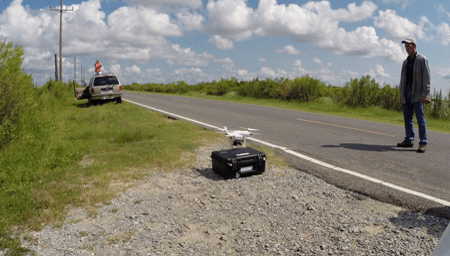
I drove with two colleagues to Golden Meadow, Louisiana where we met Dr. Mark Byrnes of Applied Coastal Research and Engineering and his son Dylan, who is the expert at piloting their quadcopter. This group has been studying some of the salt marshes in south Louisiana and want to use the quadcopter to assess vegetative recovery from disturbance as well as changes in the geomorphology of the shorelines. We convened for dinner at a local restaurant and discussed the plan for the following day. After sampling the local cuisine (grilled shrimp and sweet potato fries for me), we headed to the hotel where we fired up the quadcopter in the hotel parking lot to check that all systems were functioning properly. Dylan flew the quadcopter, with its lights flashing red and green, around the hotel and periodically up to a couple hundred feet overhead. Before long, we had drawn a crowd of hotel employees and guests. The next morning, we drove to where the study site was located and spent several hours flying the Phantom II around the area. The main objective was to get an idea of how the quadcopter would perform and to begin working out a survey protocol to use on future field trips.

Here’s a video showing some of the highlights:

The following is a more detailed description of the Phantom II that we tested and how it performed.

Description. The Phantom II is a radio-controlled quadcopter (made by DJI) that is DJIquadcopter_KLMcKee
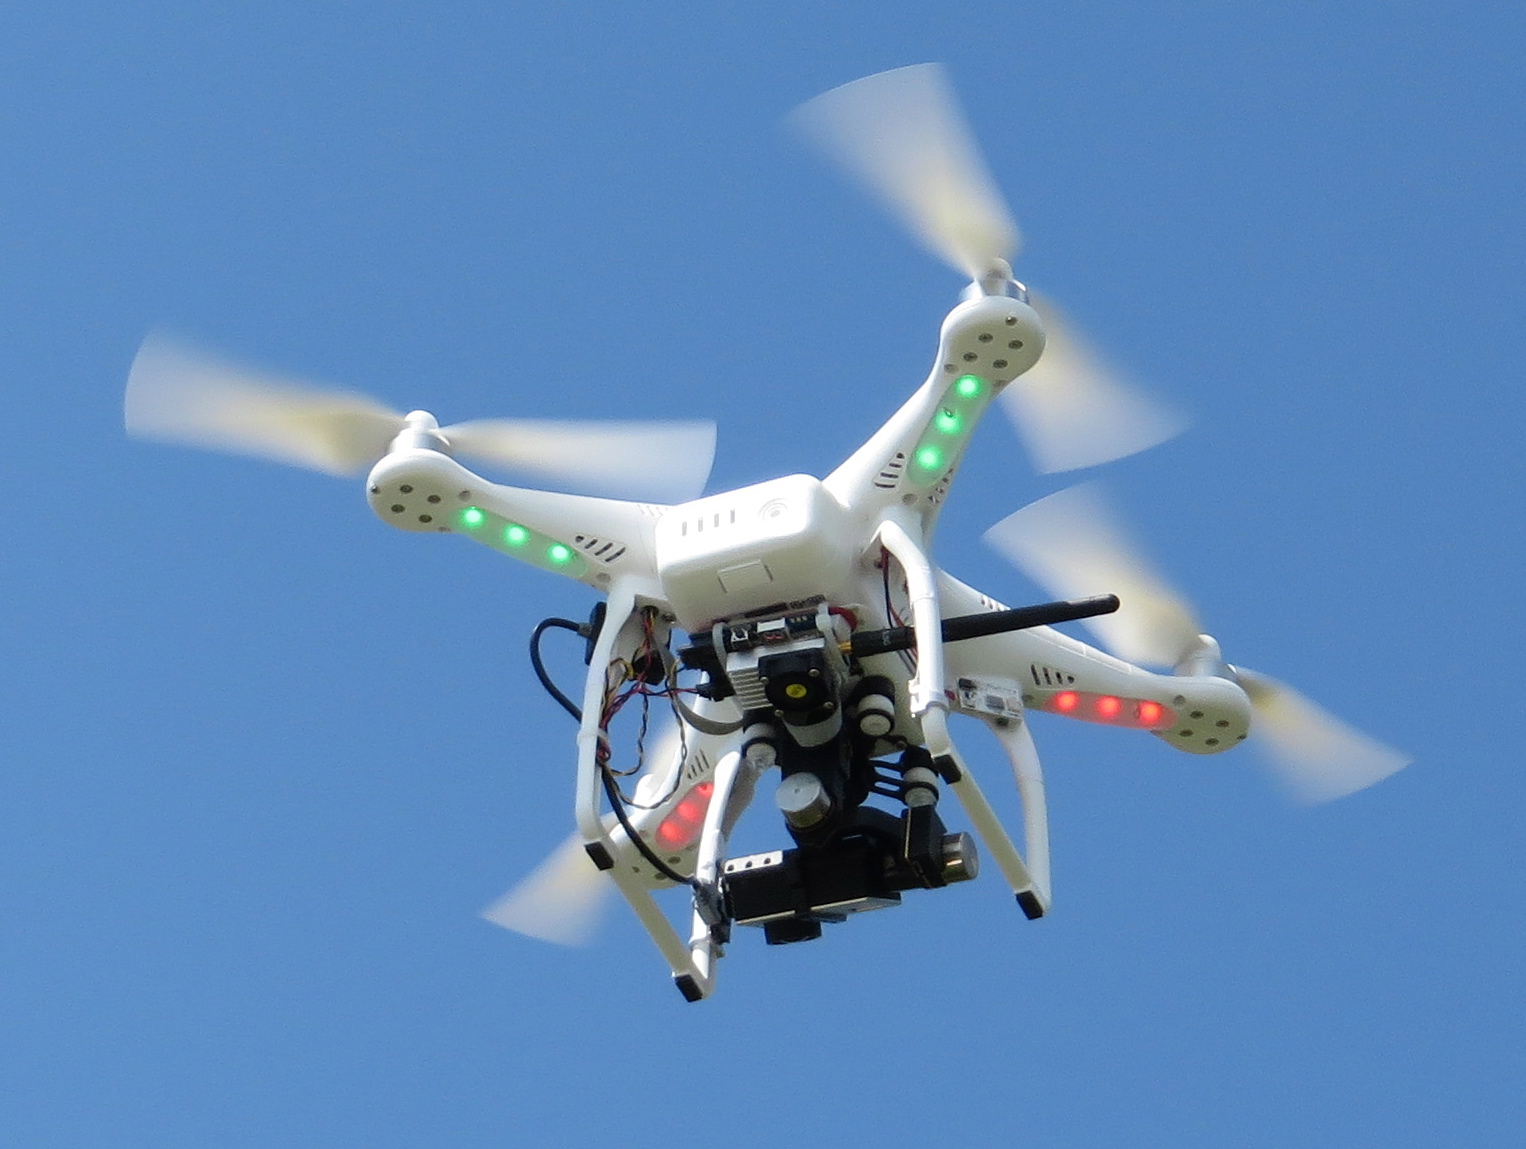
outfitted with an HD camera. It is relatively small and light and has four rotors. There are also running lights that flash red and green. The system that my colleagues purchased came with a GoPro Hero 3+ (Black Edition) camera, which was attached to the quadcopter via a special gimbal. The gimbal is essential for steady video; earlier versions did not have a gimbal, and the resultant footage was quite jerky. There are also cinema-grade gimbals that can be purchased for more serious filming. The power source is a lithium “smart” battery with four LED lights to indicate charge status; it slides into a slot on the side of the quadcopter. One battery charge is supposed to last 20 to 25 minutes, although it’s recommended to stop flying when 15% charge is reached (our flights did not go longer than 17 min). There were two extra batteries, so we had a total of about 50 minutes of flight time initially; we were able to recharge the batteries for the afternoon flights when we stopped for lunch at a local restaurant.

The quadcopter is operated with a remote control console, which has altitude and yaw movement knobs that are operated with thumb motions. The viewing position (oblique/vertical) of the camera is operated via a lever on the console. Attached to the console is a viewing monitor that shows real-time video from the camera as well as flight information such as altitude, GPS position, distance. The Phantom also can be used with iOS devices (iPhone, iPad) to view flights and to control the camera. Manual navigation can be accomplished by watching the quadcopter (if within sight of the operator) or the monitor. The GoPro Hero 3+ camera can be set to shoot “narrow” (90 degrees), “medium” (127 degrees), or “wide” (170 degrees) fields of view at different frame rates (e.g., 24, 30 or 60 fps) and resolutions (e.g, 1080p or 2.7k). The camera, set to video mode, is turned on at the beginning of the flight and runs until turned off at the end of the flight. The GoPro will also shoot high-resolution, still images, but requires a way to control the shutter (the system we tested did not have this). Another option, which we did not test, is to use the time-lapse feature on the GoPro to shoot a series of still images. Images and video footage are stored on a micro SD card and transferred to computer with a card reader (or by connecting the GoPro via cable).

There are other Phantom packages that can be seen on the DJI website, some of which are equipped with a different type of camera and gimbal system (Phantom II Vision+).

Cost and Performance. This product is not a toy–at a cost between $959 and $1,299 (depending on model), not counting accessories such as extra batteries. However, it is affordable for the professional or serious photography enthusiast. If you already have a GoPro camera, you can save a few dollars by purchasing just the quadcopter and a gimbal. Extra batteries are a must–20 minutes is simply not enough time to do much, and charging takes up to an hour. The quadcopter body is constructed of plastic and is lightweight, weighing in at 1030 grams (2.3 lbs), which means that if it crashes into a building or parking lot surface, it may suffer some serious damage. The rotor blades are the parts that are easiest to damage, but are easily replaced. Neither the quadcopter or the camera is waterproof (unless the GoPro underwater housing is used), so using it in the rain or landing it on wet ground is probably not a good idea (although some people have apparently flown it in light rain or snow). Flying in a marine environment will expose both aircraft and camera to salt spray and high humidity, which will likely take a toll over time.

Even though the Phantom II is not a toy, it is loads of fun. We had a blast watching it fly around doing different maneuvers that one might perform in a field survey. The Phantom II could hover and remain remarkably stable even in moderate wind. I was blown away by the fantastic video this quadcopter and GoPro combo could capture. The gliding footage looked like it had been shot from a crane dolly or some other expensive filming set-up. Comparable footage shot from a helicopter using a gimbal-mounted camera would cost you thousands of dollars per day—little wonder that filmmakers and wildlife photographers are adopting it. The Phantom II can be set up to fly a GPS path on a map, although we did not do this; instead, transects were flown manually using visual cues (flags) and onscreen video as a guide.

Learning curve. I did not fly the Phantom II, but could see that one could learn fairly quickly. The controls are simple and if you get into difficulty, releasing the sticks will cause the quadcopter to stop moving and hover in place until you get your bearings again. However, people have crashed these things, especially when in tight quarters…near trees or buildings, for example. We were out in the open and only had a few power lines to worry about. It’s also possible to navigate using only the monitor and live feed from the camera, although it’s easy to get confused about direction when you can no longer see the aircraft in the sky. Some experts recommend learning to fly an inexpensive UAV before trying to operate something expensive like the Phantom II. Another option is to get a few lessons from an experienced Phantom II pilot before striking out on your own. Also, it seems obvious that a beginner should learn somewhere with wide open spaces–a park or field–where there is plenty of room. I’ve watched several videos of first flights attempted in an urban setting with numerous obstacles such as buildings, power lines, signs, trees, and people….quite a number of these end with a crash.

Fly responsibly. It became clear to me that a UAV should not be flown in a populated area by an inexperienced pilot, and even with an experienced pilot there is still the possibility of a crash due to mechanical failure or loss of communication with the aircraft. People and property have been struck by them, so liability is something to keep in mind. Stories of flyaway quadcopters abound on the Internet; there is even a Facebook site providing psychological support for folks whose aircraft have crashed or gone rogue and flown away. For many research scientists and outdoor photography enthusiasts, these quadcopters will more likely be used away from population centers where there is less likelihood of hurting people or damaging property. Probably a bigger concern in those cases is disturbance of sensitive wildlife.

Although the Phantom II supposedly can go as high as 1000 feet, the FAA in the US restricts UAVs to 400 feet or lower. Also, there is a built-in warning system that will not allow you to fly one near an airport (a warning sounds and within a mile of an airport, the quadcopter stops flying). We were mostly flying low altitudes (6 meters/20 feet) along transects across a marsh; however, it’s wise to have someone spotting for aircraft if flying at higher altitudes. In the US, the FAA allows non-commercial (i.e., hobby and recreational) use of UAVs as long as they are flown responsibly and according to regulations. Update: Research is not currently considered a recreational use by the FAA and may require a Certificate of Authorization (COA) (Public Operations-governmental) or Special Airworthiness Certificate-Experimental Operation (Civil Operations-nongovernmental) (see comment by Victor Villegas for more). At the moment, it appears that a researcher at a public institution such as a university will need a COA to operate a UAS. However, the FAA regulations regarding small Unmanned Aircraft Systems (sUAS) are in a state of flux; a new FAA rule governing operation of sUAS is expected later this year to address the recent demand for their use for commercial purposes. Other countries may have different rules and regulations–best to check before purchasing or flying.

Well, that is a brief overview of my observations of the Phantom II Quadcopter. There are many more detailed reviews and videos online…so I recommend watching a few of these to get a more in-depth look. I see a lot of ways these aircraft might be used in scientific research and will perhaps write a followup post as more scientists publish their quadcopter videos and descriptions of how they are using them in research.

I wished there had been time to film in some other habitats, but it wasn’t possible on this trip. However, this brief taste was enough to make me consider buying one.

Where to find aerial footage.  A couple of handy sites to find aerial video shot anywhere on earth are www.travelbydrone.com and www.dronetrotter.com. Both sites feature a world map with site markers showing where a video has been shot. You click on the play icon and a player window opens with the video.

Using Video to Crowdfund Scientific Research

Are you like a lot of scientists who are struggling to fund your research or find collaborators to share ideas and costs? If you are, then you might be interested in new platforms that bring researchers together with fellow scientists, science enthusiasts, and potential sponsors.

One such platform is Thinkable, where people can learn, track, and fund science topics that are specifically interesting to them. Scientists create a profile on Thinkable and then upload a brief video (3 minutes max) describing a new idea for a study, a recent paper, a conference presentation, or just a tour of their laboratory. The idea is to have an online meeting place where scientists can interact directly with other people who are interested in their area of research.

I was contacted recently by Ben McNeil, one of the founders of Thinkable, who is a proponent of video as a means of science communication. He had seen my blog and some of my videos and decided to get in touch. We had a great Skype conversation about Thinkable and about the use of video by scientists to connect with other researchers and especially as a means to solicit crowdfunding. Ben wrote a complimentary blog post about me and my efforts in teaching videography to scientists. I’m hoping to meet up with him and colleagues next year when I visit Australia to share ideas.

How Does It Work? Visitors to the Thinkable site can follow a scientist or a specific project by becoming a fan. A prospective student interested in a particular field, for example, might follow an established researcher and learn more about the projects they are currently working on. Through the video snapshots, potential collaborators can see where their respective research areas overlap and perhaps embark on a joint project. Or a nature lover may want to support research on deserts, rainforests, or coral reefs—wherever their specific interest lies. Fans receive updates from the research they have chosen to follow.

Someone can become a sponsor with a donation of as little as $1. Sponsors receive in return more in-depth information and updates about the specific research project they support. They can learn first-hand about an exciting area of research—how it is conducted or how the findings will benefit society. They can follow the progress of the researcher as s/he conducts experiments and interprets the results.

I set up a profile on Thinkable to test it out and uploaded a couple of videos to see how that worked. Setting up a profile is very easy and fast, as is uploading videos. You just list a few facts about yourself, a brief bio, and contact information. There are then three areas for interaction. In “my ideas”, a researcher uploads a video (or image) to introduce a campaign, a poster, a paper, or a talk. You can add as many “ideas” as you like, but are restricted in terms of how much you can say or show about each one. A campaign is specifically used to solicit support for a research project. Here, a researcher provides a brief text description of the proposed project and explains why it is innovative, as well as a short video “pitch”. In “my sponsorships”, you have the option of allowing people to donate or sponsor your research through Thinkable; you may also choose to decline this option and only showcase your research. In “my thinkers”, you select other Thinkable researchers to follow. It took me about 20 minutes to set up a profile and upload a couple of videos. The interface was easy to navigate, and the finished feed is visually attractive.

There are several examples of campaigns on the Thinkable landing page where you can get a better idea of how other researchers are using video to pitch their ideas.

Why Video? Thinkable founders have focused on video as an effective medium for sharing science information. Researchers are encouraged to use video snapshots to connect with fellow scientists, students, and science enthusiasts. Of course, I’m all in favor of video as a medium to share science information and also think that this approach lends itself well to crowdfunding efforts. Video snapshots force a scientist to pare their message down to the core idea behind their proposed project and to make their case concisely and convincingly. I find that many proposals fail because the PI gets bogged down in too much detail and neglects to state a single, clear goal and anticipated outcome. I think that making a three-minute video can help a proposer find and articulate that message. Potential supporters, especially the general public, will likely appreciate the video approach, as opposed to a lot of text.

In addition to raising funds, a scientist can showcase their research publications with brief videos on Thinkable, which are then discoverable by search engines. A video on a sharing platform such as Thinkable is freely accessible, in contrast to a journal article, which is likely behind a paywall. So someone without a journal subscription can still learn about your work by watching a video. But such visual snapshots are more than just a way to make one’s work more visible online. As I’ve explained in previous posts, videos allow authors to explain their work in ways they cannot with the journal article. Video can enrich a technical article and encourage the reader/viewer to explore the topic further.

The video format also does not violate copyright restrictions typically imposed by science journal publishers but instead allows the scientist to visually share important insights from their work. Quite a few authors infringe copyright law by posting the journal-formatted pdf on their websites or on other repositories. Some are unaware that they are violating copyright, whereas others do it knowingly and assume they won’t be challenged. A better approach is to produce a separate information product that simply displays the essence of the work in an easily accessible and understandable format—such as video. When posted online, these visual products serve as pointers to the original publication hosted on a journal’s website. You own the copyright to the video since you’ve created it using your own media and data from your publication (as author you retain intellectual property rights to your data and any contents of a publication).

Filling a Need. Although other video-sharing platforms such as YouTube are currently where many scientists are posting their videos, there is a need for dedicated platforms where researchers can share information and interact with science information consumers and potential sponsors. I think there will be more platforms like Thinkable in the future, and many will be designed around video to solicit funding or to display scientific information. Science information consumers and sponsors will increasingly expect media-rich content on such sites, and scientists must be prepared to provide it.

A Site to Post Your Video Abstracts

I’ve written previously about what video abstracts are, how they can influence visibility of your research papers, and how to create a video abstract from start to finish. The beauty of video abstracts is that they are freely accessible on media-sharing platforms, unlike many journal articles locked behind paywalls. As I’ve said before, people cannot cite your work if they are unaware of it.

One of the issues I touched upon in describing video abstracts is the fact that few journals offer the option for authors to submit and display a video abstract. I think this is slowly changing as more publishers see the value of video in making scientific articles published in journals more discoverable.

In the meantime, what is an author to do if their journal of choice lacks this option?

As I suggested previously, an author can always post their video abstract on their own website, perhaps in their list of publications. Instead of a boring list of pubs, visitors to your professional website will see a video player with a visual abstract explaining your paper. There is now another alternative: WeShareScience, a website that allows users to create a video abstract (with an online tool) or to upload one created elsewhere. When you visit the site, you see a Pinterest-type platform with “pinned videos”, which can be grouped onto boards, which organize videos by topic. There is a browse option to see videos organized by discipline or topic. There are social media options allowing a visitor to “follow” a researcher as well as to share a video with others. Here’s a screenshot:

screenshot_wesharescience_videos

The site was created by Ryan Watkins, an associate professor at George Washington University in Washington D.C., to facilitate teaching students in his courses. He wanted to use video-based, rather than text-based, assignments to assess student learning. That is, he would assign students the task of creating a video abstract about research they were reading in class, and he could assess how well they understood it by the video they produced. Of course, it also taught them an essential communication tool that will be needed by 21st century scientists. The WeShareScience platform was created to allow students to more easily create video abstracts and for him to easily aggregate and organize the student videos. The WeShareScience site is also open to anyone wishing to create a board to display their own research or that of someone else. Ryan has written an article, published on the Wiley Exchanges blog, about his approach to student learning. Another article on the Wiley Exchanges blog by Victoria Dickerson focuses on using video abstracts to enhance the visibility and usability of journal articles.

Check out WeShareScience and see what you think. The availability of such platforms will likely increase in the future, so that there may be other options to promote the visibility of your research. However, I do recommend that you submit your video abstract to the journal (if they provide that option), since research by Scott Spicer shows that a majority of views occur on the journal’s website compared to views on YouTube. However, you may reach additional viewers, especially those outside your field, by posting a video abstract on a media-sharing platform (YouTube, Figshare). If you know of other platforms where researchers can post video abstracts, please leave a comment.

Why Researchers Should Interact With The Public

Scientists usually have a strong opinion about directly sharing their work with the public. Some think it is not only a good idea but essential for scientists to explain their research in everyday language to a broad audience. Others think such efforts are a waste of time—time they could be spending on their research. I’m in the former camp, but once thought that I did not have time for outreach and that it had little or no benefit for me. I knew there were science communicators whose job it was to translate my science for public consumption; so why should I waste my valuable time?

I changed my mind when a “communication specialist” attempted to write about one of my research projects. As the expert, I was asked to review and revise the piece before it was published. Well, I was horrified to see that the article was terrible and would have conveyed an inaccurate picture of my research and, by extension, of me. I spent a lot of time trying to “fix” the article. I kept going back and forth with the author trying to explain why what she said was confusing and not totally accurate. Finally, I threw up my hands and said (to myself), “It would have been easier if I had written this myself.”  That piece was never published, but I went on to write a non-technical fact sheet on the topic, which was published. That was the beginning. I went on to write several more fact sheets and non-technical articles and, eventually, to make videos about my research. I discovered that I enjoyed creating these information products and that they were very popular, especially with students.

Don’t get me wrong. There are a lot of great science communicators out there who do a wonderful job describing scientific discoveries and the underlying research. If you are lucky enough to work with one of them, you should. My point in describing my experience is to show what it took to change my mind about interacting with the public and to also suggest that as scientific researchers, we have a unique perspective on the topic that the public wants to hear.

I was reminded of my experience when I came across a brief video on the National Science Foundation’s website by Lawrence Krauss, well-known physicist and recipient of the 2012 Public Service Award. In it, he makes the case for scientists to share their work with the general public. Take a look, and then I’ll have a few more words to say about the topic and my experiences along these lines. In case you can’t see the player window, here is the direct link: http://bcove.me/lt4ojvh7 [bc]http://bcove.me/lt4ojvh7[/bc]

Why Is Interacting with the Public Important?

I’ve discussed the various reasons why scientists should explain their work to the public in previous blog posts. Dr. Krauss mentions a few. One reason is that our research is paid for by public funds (in one way or another), which means the average person on the street has a right to know what we are doing. Not all researchers would agree with this. However, long gone are the days when a scientist could stay sequestered in their ivory tower. We may be called upon to explain our work on camera or to comment on a disaster. I and my colleagues are often contacted by journalists, by scientific journals (for a comment on a recent publication), and by local TV stations; a few colleagues have even been asked to testify before Congress. Having good communication skills are increasingly essential for researchers. Being a good communicator, however, like anything else, takes practice. And talking to the public or to the media is not the same as interacting with your colleagues. By being proactive and interacting with the public (e.g., giving a public lecture or inviting a school group to your lab), we gain valuable experience that may come in handy in the future.

There is a more important reason than the public’s right to know, however. It is in our own best interests to keep the public informed and interested in scientific research. Science funding is influenced by public opinion, and we should be concerned about what the public thinks of science and scientists. There are a number of anti-science and pseudoscience groups that are well-funded and technologically savvy. Their rhetoric may misinform the public and sway opinions unless scientists step up and provide credible and accurate information to counter outlandish claims. This, for me, is a strong motivation….much more so than simply wanting to explain my work because it’s important or interesting.

I liked the point made in the video that the ideas and discoveries in science are part of our culture like art or music or literature and should be more broadly shared. Although it is satisfying to contribute to scientific knowledge, it is doubly rewarding to know that you’ve also made a contribution to the cultural landscape by broadly sharing your insights about the Earth or the universe. By communicating our research directly, we can share our scholarly pursuits with people who otherwise may never have the experience. What motivated us to study viruses or how we managed to collect our samples from an active volcano is information that reveals us to be human and is what people can relate to.

I think many researchers are hesitant to share their work with the public because of the perception that the public doesn’t care about science. However, the public is most definitely interested in science, in new ideas, and in exciting discoveries. One only need look at the millions of viewers attracted by TED videos to be convinced of this. As Dr. Lawrence suggests, give it a try…you might be pleasantly surprised at the reaction. Yes, there are concerns about attracting negative attention by going public, especially if you work in a “controversial” field such as climate science. However, for most researchers, this is not a major concern.

Unexpected Bonus of Public Interaction

Dr. Krauss made an excellent point right at the beginning: a good way to understand things is to explain them. For early-career researchers, experience explaining your work to broader audiences will build confidence and may also have a feedback effect on your research. A deeper understanding (and appreciation) of my subject has been for me an unexpected and useful outcome of developing information products for a general audience. For one thing, the process has helped me see things through my audience’s eyes—which has improved my technical presentations and writing.

Explaining complex science topics so that the general public can understand also makes you really think about the broader aspects of your research. Why is my work important to society? What would the average person find interesting about it? How will it advance knowledge in my field? What are the broader implications of my work? What new questions does my research raise? A number of funding agencies (e.g., the U.S. National Science Foundation or the National Institutes of Health) expect researchers to be able to articulate the “broader impacts” of their proposed project in grant proposals. An ability to explain your work to a broader audience will put you at an advantage over those colleagues who lack those skills or who choose to remain in their ivory tower.

Encourage, Don’t Discourage Researchers to Interact with the Public

Not every scientist should interact with the public. As Dr. Krauss points out, there are some researchers who should be kept in the ivory tower—you can probably think of a few colleagues who belong in this category. It would be a mistake for an administrator, for example, to force all researchers in their organization to interact with the public. Instead, we should encourage those scientists who have good teaching (or other interpersonal) skills to explain their work more widely. In any scientific discipline there are thousands of members; if only a small percentage give public lectures, start science blogs, or make science videos, there will be a significant impact.

We also should be encouraging and training the next generation of scientists to be better communicators—something that a few schools are implementing in their science curricula. I find that many more students these days express an interest in science communication, and this may have a snowball effect as they become teachers and mentors to future generations of scientists.

In summary, there are many ways for scientists to interact with the public and a number of benefits for the individual scientist as well as for the science community as a whole. Also, there are various ways for a scientist to interact with the public. Since this is a blog about science videography, I have to say that video is a very effective and efficient way to share your research with the public. When I think back to the time when I thought public engagement was a waste of time, I cringe. But I do understand the mindset of those researchers who avoid interacting with the public. As Dr. Krauss suggests, if you feel really uncomfortable, then perhaps you shouldn’t. However, it’s worth trying at least once. Who knows? Like me, you may discover a whole new way of communicating.

How to Shoot Fisheye, Wide Angle, and Macro Views with an iPhone

If you would like to take your videography/photography with the iPhone to the next level, you might be interested in the Ōlloclip, a 3-in-1 lens (fisheye, wide angle, macro) combination that clips onto the phone. It’s small, lightweight, and easy to use. My husband gave it to me as a gift, and I finally got around to testing it out on a recent trip. The version I have is the original Ōlloclip with three lenses for the iPhone 5/5s. The company has newer versions with four lenses (fisheye, wide angle, 10x and 15x macro). They also sell a telephoto and a few accessories (see www.olloclip.com). There is also an app for the Ōlloclip in the App Store, which helps to compose your shots during filming.

I’m still exploring ways to use the Ōlloclip, but thought I would do a quick video review/tutorial about it:

I was impressed with the design and quality of the device. Basically, there are three lenses fashioned into a double-sided clip that can be easily flipped around to access either the fisheye lens (one side) or the wide angle-macro lenses (other side). The fisheye provides a 180 degree view of a scene, and the wide angle approximately doubles the field of view from the normal iPhone camera. To access the macro (10x on my version), you unscrew the wide angle lens. You have to get within about an inch (10-15 mm) of the subject to focus the macro properly (the app contains a loupe that helps to ensure a good focus with the macro).

The clip slips onto the top edge of the iPhone so that the desired lens is covering the rear-facing camera. The clip fits over a screen protector, but is too snug to work with a standard phone cover (other than one that Ōlloclip sells). The clip also covers the power switch on the top of the phone, but this is not a problem as a slot in the clip prevents it from pressing on the switch. You can still access the phone menu through the “Home” button.

All in all, I found the Ōlloclip to be well-made and easy to use. It seems to be pretty rugged, although it probably would not survive a drop to concrete. Due to its small size, the Ōlloclip is convenient to carry in a pocket or purse; however, the Ōlloclip’s small size also makes it easy to lose–so be careful. I carry it inside the provided bag but then store that in a larger bag along with some other iPhone accessories.

I especially like the macro, which works quite well to get close-ups of objects. See the next series of photos (of a dried rose) for a comparison. I snapped all of them without the aid of a tripod to see how much blurring might occur with minor hand shake (normally with macrophotography, you would want to use a tripod and also a remote shutter to eliminate movements that would blur the image).

The first one was taken with the regular phone camera–as close as I could get and stay in focus. If you zoom in, you see that the image is blurred, which I could not see when I took the photo.iphone_regular


The second one was also taken with the regular phone camera, but I used the pinch-zoom gesture to get a bit closer. The image is better but still out of focus.

iphone_zoom


The third one was taken with the Ōlloclip macro lens attached to the phone. I got the image in focus, and you can begin to see the individual cells of the rose petals; however, it was difficult to see if I had the focus just right while I was shooting (I was aiming for the crack in the center of the image).iphone&macro


The final image was taken with the macro lens plus the aid of the Ōlloclip app. I set the loupe in the app for 3x, which let me better see how well I was focused on the rose petal (this does not affect the view of the final photo). Although the point I selected (crack in theiphone&macro&loupe image center) was in focus, you notice that surfaces in other planes of view are not in focus. The iPhone is limited in controlling depth of field, but The Ōlloclip app allows you to select which part of the image you want to be in focus (AF) as well as the point of reference for exposure (AE), just by sliding two targets around on the screen. This dual setting provides a lot of flexibility in composing a shot. The native iPhone camera app, by comparison, only allows you to set the AE/AF together by tapping on a point on the screen.


The app also works without the Ōlloclip, allowing you to independently set the AF and AE for filming through the native iPhone lens. Conversely, you can use the Ōlloclip with other photography apps, but I’ve not tested those sufficiently to say how well they work with the Ōlloclip lenses.

You can find out more about the Ōlloclip at www.olloclip.com.